```html
How to Remove the Screen from a Moen Bathroom Sink Faucet
Maintaining a clean and functional bathroom is essential for a comfortable and hygienic living space. Among the various fixtures in a bathroom, the sink faucet plays a crucial role in water flow and temperature control. One important aspect of faucet maintenance is the cleaning of the screen, which can accumulate debris and sediment over time, affecting water flow and quality.
In this article, we will provide a comprehensive guide on how to remove the screen from a Moen bathroom sink faucet, allowing you to effectively clean and maintain your faucet for optimal performance.
Before proceeding, it is important to gather the necessary tools and understand the safety precautions involved. You will need a pair of pliers, a small flathead screwdriver, and a cloth or towel. Ensure that the water supply to the faucet is turned off before starting the process.
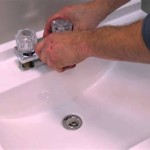
Step 1: Locate the Screen and Unscrew the Aerator
Identify the aerator, which is typically located at the tip of the faucet spout. Use pliers to gently unscrew the aerator counterclockwise. Avoid using excessive force, as this could damage the aerator or the faucet.
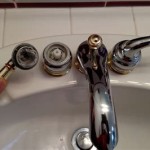
Step 2: Remove the O-rings and Washer
Once the aerator is removed, you will see an assembly of O-rings and a washer. Carefully remove these components and set them aside. Note the order in which they are arranged, as they will need to be reassembled in the same way.
Step 3: Extract the Screen
Behind the O-rings and washer, you will find the screen. Use the small flathead screwdriver to gently pry the screen loose from its housing. Be careful not to damage the screen or the surrounding components.
Step 4: Clean the Screen
Once the screen is removed, inspect it for any debris, sediment, or mineral buildup. Rinse the screen thoroughly with water and use a soft brush or cloth to gently remove any stubborn particles. Avoid using harsh chemicals or abrasive materials, as these could damage the screen.
Step 5: Reassemble the Faucet
After cleaning the screen, reinsert it into the faucet housing. Ensure that it is securely seated and aligned correctly. Replace the O-rings and washer in the same order they were removed. Finally, screw the aerator back onto the faucet spout by hand and tighten it using pliers.
Conclusion
Removing the screen from a Moen bathroom sink faucet is a relatively straightforward process that can help maintain optimal water flow and quality. By following the steps outlined above, you can effectively clean and reassemble the faucet, ensuring its longevity and functionality.
```
Remove Aerator From Moen Faucet Non Threaded

Diy Moen Faucet Areator Install For Free Works Most Brands Easy Step By Bath

How To Remove An Aerator From A Moen Bathroom Faucet Quora

How To Install A Water Saving Aerator In Your Moen Bathroom Faucet

How To Remove A Moen Kitchen Faucet Aerator

Fixing A Faucet Aerator You Can Be Diy R Too The Kim Six Fix

How To Clean A Faucet Aerator

How To Remove An Aerator From A Moen Kitchen Faucet Mr Faucets

How To Clean A Sink Faucet Screen

Danco Multi Use Faucet Aerator Key Tool For Removal 10909 The Home Depot
Related Posts