Removing Pipes Under Bathroom Sink: Essential Aspects to Consider
Whether you're embarking on a bathroom renovation or troubleshooting plumbing issues, removing pipes under a bathroom sink is a crucial step. Understanding the essential aspects of this task will ensure a successful outcome and prevent costly mistakes. This article explores the key considerations, providing a comprehensive guide to navigate the process efficiently.
Before delving into the specifics, let's identify the part of speech of the keyword "Removing Pipes Under Bathroom Sink." It is a verbal phrase, indicating an action to be performed. This insight guides our focus on the active steps involved in the process.
1. Safety Precautions
Safety should be the utmost priority when working with plumbing. Turn off the water supply at the main shut-off valve before commencing any work. Protect your hands with gloves and your eyes with safety glasses. Ensure adequate ventilation or wear a respirator, as some materials may emit fumes.
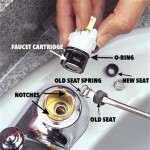
2. Identifying and Disconnecting Pipes
Locate the pipes under the sink, typically made of copper, PVC, or PEX. Determine the type of fittings used, whether slip nuts, compression fittings, or soldered connections. Use the appropriate tools to disconnect the pipes, such as wrenches, basin wrenches, or a pipe cutter.
3. Removing Obstructions
Check for any obstructions, such as old caulk or debris, that may hinder the removal process. Carefully clear these obstacles to avoid damaging the pipes or the surrounding area.
4. Dismantling Drain Connections
Disconnect the drain connections from the sink. Locate the P-trap, a U-shaped pipe that traps water to prevent sewer gases from entering the home. Remove the P-trap and clean it before reconnecting it.
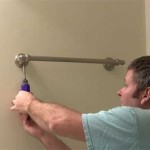
5. Detaching the Sink
Once the pipes and drains are disconnected, carefully lift the sink from its mounting brackets or pedestal. Be cautious not to pull too hard or damage the sink or countertop.
6. Replacing or Reinstalling Pipes
If new pipes are required, measure and cut the appropriate lengths. Use the correct type of fittings and apply sealant or Teflon tape to ensure watertight connections. Reinstall the pipes following the same steps in reverse order.
7. Leak Testing
Turn the water supply back on and check for any leaks. Inspect all connections, including the drain connections, for any drips or seepage. If leaks occur, tighten the fittings or reapply sealant as needed.
By adhering to these essential aspects, you can confidently remove pipes under a bathroom sink, ensuring a safe and successful outcome. Remember to consult a professional plumber if you encounter any difficulties or have concerns about the safety of the work.

How To Install A Pipe From Sink Drain Wall Ehow

Diy Plumbing Blog How To Clean A Drain Trap

How To Clean Out A Sink Trap Bailey Brothers Plumbing

How To Unclog A Bathroom Sink Hana S Happy Home

P Trap Removal Diy Rex

How To Unclog A Sink The Right Way

The Most Effective Way To Clean A P Trap Asi Hastings

Easy Fix A Leaky Sink P Trap Or Clean Stinky Drain

How To Remove A Bathroom Sink Drain Ehow

Bianchina Swapping Out A Bathroom Sink Drain And Pop Up