Installing a Bathroom Sink Drain: A Step-by-Step Guide
A bathroom sink drain is an essential component that ensures proper drainage and prevents water from overflowing. Installing one can seem daunting, but following a step-by-step procedure can make it a manageable task. Here's a comprehensive guide to assist you in successfully installing a bathroom sink drain:
Tools and Materials Required:
- Adjustable wrench
- Slip-joint pliers
- Plumber's putty
- Teflon tape
- Drain strainer
- Drain assembly
- Washer
Step 1: Remove the Old Drain
Start by placing a bucket or bowl underneath the sink to catch any water that may drain out. Use an adjustable wrench to loosen the slip nut that connects the drain assembly to the sink. Carefully remove the drain assembly and discard it. Clean the drain hole of any debris or old putty.
Step 2: Apply Plumber's Putty
Roll out a small amount of plumber's putty into a thin snake. Shape it into a ring and place it around the edge of the new drain flange. The putty will create a watertight seal between the drain and the sink.
Step 3: Wrap Teflon Tape
Wrap several turns of Teflon tape clockwise around the threads of the tailpiece, where it will connect to the drain flange. This tape will prevent water leaks and ensure a tight connection.
Step 4: Install the Drain Assembly
Insert the washer into the drain hole from below the sink. Align the drain assembly with the drain hole and place it on top of the washer. Hand-tighten the slip nut onto the tailpiece, ensuring the putty seal is securely in place.
Step 5: Tighten the Slip Nut
Using an adjustable wrench, gradually tighten the slip nut by turning it counterclockwise. Avoid overtightening, as this can damage the drain or the sink. Ensure the drain is securely connected and there are no leaks.
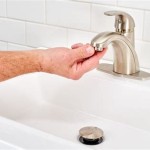
Step 6: Install the Drain Strainer
Insert the drain strainer into the drain hole from above the sink. The strainer will prevent hair and debris from clogging the drain. Screw on the drain stopper, if desired, to complete the installation.
Tips:
- Use a flashlight to inspect the drain hole for debris or blockages.
- Apply a thin layer of plumber's putty to the bottom of the drain strainer to prevent water leaks.
- Test the drain by running water in the sink and checking for any leaks.

How To Install Bathroom Sink Drain Queen Bee Of Honey Dos

Bathroom Sink Drain Diagram Plumbing Kitchen Remodel

How To Plumb A Bathroom With Multiple Plumbing Diagrams Hammerpedia

How To Easily Connect The Plumbing For A New Bathroom Sink Hometips

How To Connect A Bathroom Sink Drain

Installing A Bathroom Sink Drain Efficient Plumber

How To Install A Pipe From Sink Drain Wall Ehow

How To Replace A Pop Up Sink Drain Install The New Handymanhowto In 2024 Bathroom

How To Fit A Bathroom Sink Diy Guides Victorian Plumbing

Bathroom Sink Plumbing Installation Diy Montreal
Related Posts