Attaching Bathroom Sink Drain Pipe: A Comprehensive Guide
Installing or replacing a bathroom sink drain pipe can be a straightforward task with the right tools and knowledge. This guide will provide you with step-by-step instructions to ensure a water-tight and effective seal.
Materials Required:
- New drain pipe
- Slip joint pliers
- Plumber's putty
- Adjustable wrench
- Thread sealant (optional)
Step 1: Remove the Old Drain Pipe
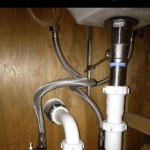
Under the sink, locate the slip joint nut that connects the drain pipe to the drain assembly. Using slip joint pliers, loosen the nut by turning it counterclockwise. Carefully pull the old drain pipe downward to detach it.
Step 2: Apply Plumber's Putty
Roll a rope of plumber's putty and mold it into a ring slightly larger than the diameter of the drain flange on the new pipe. Place the putty ring around the flange, ensuring it completely covers the underside.
Step 3: Insert the New Drain Pipe
With the putty ring in place, align the flange of the new drain pipe with the drain assembly hole. Gently push the pipe upward until the putty forms a seal against the sink.
Step 4: Tighten the Slip Joint Nut
Slide the slip joint nut over the exposed end of the new drain pipe. Use slip joint pliers to tighten the nut clockwise until it is snug but not overtightened. Avoid using excessive force, as it could damage the pipe.
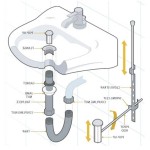
Step 5: Connect to the P-Trap
Locate the outlet of the drain pipe and insert it into the inlet of the P-trap. Tighten the slip joint nut on the P-trap to secure the connection.
Step 6: Apply Thread Sealant (Optional)
If desired, apply a small amount of thread sealant to the threads of the drain pipe where it connects to the tailpiece of the P-trap. This will help prevent leaks.
Step 7: Tighten the Tailpiece
Using an adjustable wrench, tighten the tailpiece onto the drain pipe by turning it clockwise. Be cautious not to overtighten, as it could crack the tailpiece.
Step 8: Test for Leaks
Turn on the water and allow it to run into the sink. Inspect all connections for leaks. If any leaks are found, tighten the corresponding connections slightly.
Tips:
- Ensure the drain pipe is the correct size for your sink and P-trap.
- Use high-quality plumber's putty to create a durable seal.
- Tighten the connections gradually to avoid damage.
- If working with PVC pipes, use PVC cement instead of plumber's putty.
- Consider using a drain plug to prevent debris from clogging the drain.
Conclusion
By following these steps, you can successfully attach a bathroom sink drain pipe and enjoy a leak-free and functional sink. Remember to double-check all connections to ensure a proper seal, and contact a professional if you encounter any difficulties.

How To Install A Pipe From Sink Drain Wall Ehow

How To Install P Trap And Bathroom Sink Drain Piping Easy Installation For Beginners

How To Install Bathroom Sink Drain Queen Bee Of Honey Dos

How To Connect A Bathroom Sink Drain

Bathroom Sink Plumbing Installation Diy Montreal

Bathroom Sink Plumbing Installation Diy Montreal

How To Install Bathroom Sink Drain Queen Bee Of Honey Dos

4 Ways To Seal A Sink Drain Pipe

How To Easily Connect The Plumbing For A New Bathroom Sink Hometips

How To Install The P Trap Under A Sink Dummies