Essential Aspects of Delta Single Handle Bathroom Faucet Disassembly
Maintaining and repairing bathroom faucets is a common task for homeowners and DIY enthusiasts. Delta single handle bathroom faucets are known for their durability and ease of use, but like all fixtures, they may eventually require disassembly for cleaning, repair, or replacement. Understanding the essential steps of Delta single handle bathroom faucet disassembly will empower you to tackle this task confidently and effectively.
Tools and Materials Required
Before embarking on the disassembly process, gather the necessary tools and materials: adjustable wrench, hex wrench (Allen key), screwdriver (usually Phillips or flathead), pliers (optional), replacement parts (if needed), and a small basin or container to collect any water that may drain from the faucet.
Step-by-Step Disassembly Instructions
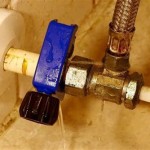
1. Shut Off Water Supply: Locate the water shut-off valves under the sink and turn them clockwise to close them. This prevents water from flowing into the faucet during disassembly.
2. Remove Aerator (Optional): If your faucet has an aerator, use pliers or a wrench to unscrew it from the tip of the spout. This may help prevent aerator damage when disassembling the cartridge.
3. Remove Handle: Using a hex wrench or screwdriver, loosen the set screw located on the side or underside of the handle. Grip the handle firmly and pull it straight up to remove it.
4. Remove Cartridge Stem: Grip the cartridge stem with pliers and gently rock it back and forth to loosen it. Use a wrench to unscrew the stem counterclockwise. Be careful not to damage the O-rings on the stem.
5. Remove Cartridge Housing Assembly: Use a wrench to loosen the nut that secures the cartridge housing assembly to the faucet body. Grip the housing and pull it straight up to remove it.
6. Inspect and Replace Cartridge: Examine the cartridge for signs of wear or damage. If necessary, replace it with a compatible Delta cartridge.
7. Reassemble the Faucet: Follow the disassembly steps in reverse order to reassemble the faucet. Tighten all connections securely but avoid overtightening, which can damage components.
Turn On Water Supply: Once the faucet is fully reassembled, turn on the water supply valves and check for leaks. If any leaks occur, adjust the connections as needed.
Additional Tips
- If the handle or cartridge is stuck, apply penetrating oil to the threads and allow it to soak for several minutes before attempting to remove them.
- Use caution when working with sharp tools and avoid touching the water lines with bare hands.
- If you encounter any difficulties or have any concerns, do not hesitate to consult a qualified plumber for assistance.
By following these essential steps and applying the recommended tips, you can disassemble your Delta single handle bathroom faucet safely and efficiently, ensuring a functional and long-lasting fixture for your bathroom.

How To Rebuild A Delta Single Handle Faucet

Repair Parts For One And Two Handle Delta Bathroom Faucets

Repair Parts For One And Two Handle Delta Bathroom Faucets

How To Replace The Cartridge In A Single Handle Delta Faucet Repair

Delta Repair Kit For Single Handle Faucets

Delta Foundations 4 In Centerset Single Handle Bathroom Faucet With Metal Drain Assembly Chrome B512lf The Home Depot

How To Fix A Leaky Delta Style Bathroom Faucet

Delta Single Handle Kitchen Faucet Disassembly Ifixit Repair Guide

How To Fix A Leaky Delta Style Bathroom Faucet

Delta Single Handle Kitchen Faucet Disassembly Ifixit Repair Guide
Related Posts