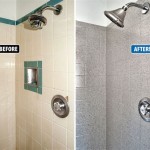
How to Tile a Bathroom Basin
Tiling a bathroom basin can be a rewarding DIY project, adding a touch of elegance and durability to your bathroom. This process requires careful planning, attention to detail, and the right tools. By following these steps, you can achieve a professional-looking finish that enhances your bathroom's aesthetics and functionality.
1. Preparation is Key
Before you start tiling, thorough preparation is crucial for a successful outcome. This includes:
- Clear the Area: Remove all fixtures, furniture, and accessories from the surrounding area to ensure a clear workspace. Protect the floor with drop cloths or plastic sheeting to prevent damage.
- Clean the Surface: Ensure the basin surface is clean, dust-free, and free of any debris. Use a mild detergent and a damp cloth to remove grime and grease.
- Check for Leaks: Before tiling, inspect the basin for any leaks. Repair any leaks before proceeding with the tiling to prevent water damage and mold growth.
- Measure and Mark: Measure the basin area carefully and mark out the tile layout with a pencil. Consider using a tile spacer to ensure consistent spacing between tiles.
- Choose the Right Tile Adhesive: Select an adhesive specifically designed for wet areas like bathrooms. Follow the manufacturer's instructions for proper application and drying time.
2. Applying Tile Adhesive and Installing Tiles
Once the preparation is complete, you can start applying the tile adhesive and installing the tiles:
- Apply Adhesive: Using a notched trowel, spread a thin layer of adhesive onto the basin surface, following the manufacturer's instructions. The notches on the trowel ensure a consistent thickness of adhesive for optimal adhesion.
- Install Tiles: Start from the center of the basin and work outward, pressing each tile firmly into the adhesive. Use a level to ensure that the tiles are installed evenly. Leave a consistent space between tiles using tile spacers.
- Cut and Shape Tiles: For areas where full tiles don't fit, use a tile cutter to cut the tiles to size. You can also use a wet saw for precise cuts, especially for intricate designs or curves.
- Clean Excess Adhesive: Immediately wipe away any excess adhesive around the tiles with a damp sponge. This will prevent the adhesive from drying and becoming difficult to remove.
3. Grouting and Sealing
After the adhesive has dried completely, the next step is grouting and sealing:
- Apply Grout: Choose a grout color that complements the tiles and fill the gaps between the tiles with a rubber-troweled grout. Apply the grout evenly and remove any excess with a damp sponge. Allow the grout to dry completely according to the manufacturer's instructions.
- Seal Grout: Sealing the grout helps protect it from moisture, stains, and mildew. Apply a grout sealer using a brush or a spray bottle, following the manufacturer's instructions. Allow the sealer to dry completely before using the basin.
- Caulk Edges: Caulk the edges of the tiled area to prevent water from seeping behind the tiles. Use a caulk gun to apply a bead of sealant around the edges, smoothing it out with a damp finger or a caulk tool.
By following these steps and taking your time, you can successfully tile your bathroom basin and transform its appearance. Regularly cleaning and maintaining the tiled surface will ensure its longevity and aesthetic appeal.

How To Make Bathroom Sink From Porcelain Tiles Step By

How To Make Bathroom Sink From Porcelain Tiles Step By

Bathroom Tile Ideas For Small Bathrooms

Bathroom Sinks In Porcelain Stoneware Kronos Ceramiche

Bathrooms Raw Dice Small Bathroom Sinks Trendy Splashback

Tile Bathroom Countertops

Cloakroom Vanity Unit With Metro Tiles As Backsplash By Bathroom Guru Splashback Downstairs Toilet

Bathroom Ceramic Tile Walls Wall Mount Sinks Design Photos And Ideas Dwell

Backsplash Advice For Your Bathroom Would You Tile The Side Walls Too Designed

50 Bathroom Tile Ideas Tilesporcelain