How To Take A Bathroom Sink Faucet Off
A leaky or malfunctioning bathroom sink faucet can be a major nuisance. If you're handy and have some basic tools, you can save yourself the expense of calling a plumber by replacing the faucet yourself. Here's a step-by-step guide to help you take off a bathroom sink faucet:
1. Gather the Necessary Tools and Materials
Before you start, make sure you have all the necessary tools and materials on hand. You'll need:
- Adjustable wrench or plumber's wrench
- Basin wrench
- Phillips screwdriver
- Flathead screwdriver
- Bucket or container to catch water
- Old towels or rags
- Replacement faucet
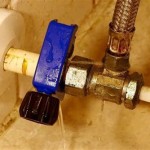
2. Turn Off the Water Supply
The first step is to turn off the water supply to the sink. There are usually two shutoff valves under the sink, one for hot water and one for cold water. Turn the valves clockwise until they are fully closed.
3. Disconnect the Water Supply Lines
Once the water supply is turned off, you can disconnect the water supply lines from the faucet. Use the adjustable wrench or basin wrench to loosen the nuts that hold the lines in place. Be careful not to drop the nuts down the drain.
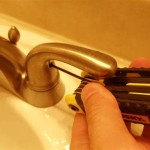
4. Remove the Faucet Aerator
The faucet aerator is a small screen that helps to create a more even flow of water. It's usually located at the end of the faucet spout. Use a flathead screwdriver to pry off the aerator.
5. Unscrew the Mounting Nuts
Underneath the faucet, you'll see two mounting nuts that hold the faucet in place. Use the adjustable wrench to loosen the nuts. Be careful not to drop the nuts down the drain.
6. Remove the Faucet
Once the mounting nuts are loose, you can remove the faucet. Be careful not to drop the faucet down the drain. Place the faucet in a safe place where it won't get damaged.
7. Clean the Sink
While the faucet is removed, take the opportunity to clean the sink. Use a mild detergent and a soft cloth to clean the sink basin and the surrounding area. Rinse the sink thoroughly with water.
8. Install the New Faucet
Now it's time to install the new faucet. Start by placing the faucet in the sink hole. Make sure that the faucet is properly aligned and that the mounting nuts are accessible from underneath the sink.
9. Secure the Faucet
Use the adjustable wrench to tighten the mounting nuts until the faucet is secure. Be careful not to overtighten the nuts.
10. Reconnect the Water Supply Lines
Reconnect the water supply lines to the faucet. Use the adjustable wrench or basin wrench to tighten the nuts until they are snug. Be careful not to overtighten the nuts.
11. Turn on the Water Supply
Turn on the water supply to the sink. Check for leaks around the faucet. If you see any leaks, tighten the nuts until the leaks stop.
12. Test the Faucet
Turn on the faucet and let the water run for a few minutes. Check for leaks. If you see any leaks, tighten the nuts until the leaks stop.
Conclusion
Replacing a bathroom sink faucet is a relatively easy task that can be completed in about an hour. By following the steps in this guide, you can save yourself the expense of calling a plumber.

Diy How To Replace A Bathroom Sink Faucet Remove Install

How To Remove And Install A Bathroom Faucet

How To Remove And Install A Bathroom Faucet

How Do I Replace Bathroom Sink Faucet Handles Cleaning More

Replacing A Bathroom Faucet Fine Homebuilding

How To Replace A Bathroom Faucet Home Repair Tutor

How To Remove And Install A Bathroom Faucet

How To Remove Moen Bathroom Faucet Handle In 2 Steps

How To Replace A Bathroom Faucet Home Repair Tutor

Tips Tricks Remove Delta 2 Handle 4 In Bathroom Sink Faucet With Bar 5 21 18
Related Posts