How To Replace A Bathroom Sink Basin
Replacing a bathroom sink basin is a relatively simple task that can be completed in a few hours. By following these step-by-step instructions, you can easily replace your old sink with a new one.
Tools and Materials You'll Need:
- New bathroom sink basin
- Basin wrench
- Adjustable wrench
- Pliers
- Plumber's putty
- Caulk gun
- Caulk
Step-by-Step Instructions:
1. Turn off the water supply: Before you begin, turn off the water supply to the sink. There will be two shut-off valves, one for hot water and one for cold water, located under the sink. Turn both valves clockwise to关闭.
2. Disconnect the water lines: Use an adjustable wrench to loosen the nuts that connect the water lines to the faucet. Be careful not to overtighten the nuts, as this can damage the water lines.
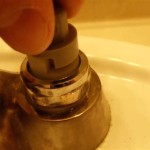
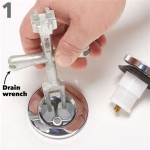
3. Remove the old sink: Place a bucket or bowl under the sink to catch any water that may drain out. Using a basin wrench, loosen the nuts that hold the sink in place. Carefully lift the old sink out of the vanity.
4. Clean the sink area: Once the old sink is removed, clean the area where the new sink will be installed. Remove any old caulk or debris.
5. Apply plumber's putty: Roll out a rope of plumber's putty and place it around the rim of the drain hole in the new sink. This will help to create a watertight seal.
6. Install the new sink: Carefully lift the new sink into place and align it with the drain hole. Press down on the sink to seat it properly.
7. Tighten the nuts: Use the basin wrench to tighten the nuts that hold the sink in place. Be careful not to overtighten the nuts, as this can crack the sink.
8. Reconnect the water lines: Use an adjustable wrench to tighten the nuts that connect the water lines to the faucet. Be sure to tighten the nuts securely, but do not overtighten.
9. Turn on the water supply: Slowly turn on the water supply to the sink. Check for any leaks around the sink and faucet. If you find any leaks, tighten the nuts until the leaks stop.
10. Apply caulk: Run a bead of caulk around the edge of the sink where it meets the vanity. This will help to prevent water from seeping into the vanity.
Your new bathroom sink basin is now installed and ready to use. Congratulations on completing this project!

How To Fit A Bathroom Sink Diy Guides Victorian Plumbing

How To Replace A Rusty Sink Drain Howtolou Com

How To Fit A Bathroom Sink Diy Guides Victorian Plumbing

Fitting A Bathroom Sink Or Bidet Step By Guide And

How To Remove And Replace A Bathroom Sink Diy

Can You Replace A Bathroom Basin Hut

How To Replace And Install A Bathroom Sink

How To Remove A Bathroom Sink Diy Projects

How To Fit A Bathroom Sink Diy Guides Victorian Plumbing

How To Replace A Sink Stopper Quick And Simple Home Repair
Related Posts