Essential Aspects of Repairing a Leaky Single-Handle Bathroom Faucet
Leaky faucets can be a pesky inconvenience, but they don't have to be a major issue. With the right tools and a little bit of know-how, you can repair a leaky single-handle bathroom faucet yourself. Here's a comprehensive guide to help you tackle this task.
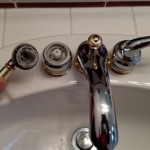
Identifying the Source of the Leak
Before you start repairing the faucet, it's crucial to pinpoint the exact source of the leak. Check the following areas:
- Handle: If the leak occurs around the handle, it's likely due to a worn-out O-ring or cartridge.
- Spout: A leak from the spout can indicate a damaged O-ring or a loose connection.
- Aerator: A clogged or damaged aerator can cause water to leak from the faucet head.
Tools and Materials
Once you've identified the source of the leak, gather the necessary tools and materials:
- Adjustable wrench
- Phillips screwdriver
- Allen wrench (if applicable)
- Replacement O-rings or cartridge
- Plumber's tape
- Rags or towels
Step-by-Step Repair Instructions
Repairing a Leaking Handle:- Turn off the water supply to the faucet.
- Remove the handle cap using a screwdriver.
- Use an adjustable wrench to loosen the packing nut.}
- Replace the worn-out O-ring or cartridge.
- Reassemble the handle, ensuring the packing nut is tightened snugly.
- Turn off the water supply.
- Remove the aerator using a wrench.
- Use an adjustable wrench to remove the spout nut.
- Replace the O-ring or washer underneath the spout.
- Reassemble the spout and aerator, ensuring a tight fit.
- Turn off the water supply.
- Unscrew the aerator using a wrench.
- Clean or replace the aerator screen.
- Reinstall the aerator and tighten it securely.
Tips for Prevention
To prevent future leaks, follow these tips:
- Avoid overtightening the faucet handle.
- Regularly replace O-rings and cartridges.
- Use plumber's tape on all threaded connections.
- Flush your faucet periodically to remove any debris.
Conclusion
Repairing a leaky single-handle bathroom faucet is a straightforward task with the right tools and instructions. By following the steps outlined above and implementing preventive measures, you can keep your bathroom faucet leak-free for years to come.

How To Repair A Leaky Lavatory Faucet

How To Fix Moen Single Handle Faucets

How To Fix A Leaky Bathroom Sink Faucet

Is Your Ceramic Disc Faucet Leaking Here S How To Clean Fix It

How To Fix A Leaky Single Handle Sink Faucet

Bathroom My Single Handle Faucet Is Leaking Or Dripping

How To Fix Moen Single Handle Faucets

How To Fix A Leaky Faucet True Value

How To Fix A Leaky Single Handle Tub Shower Faucet Danco

How To Repair A Single Handle Kitchen Faucet Diy Family Handyman
Related Posts