How to Fix a Leaking Single-Handle Bathroom Faucet
A dripping faucet can not only be a nuisance but also waste a lot of water, leading to increased water bills. Single-handle bathroom faucets are popular for their ease of use and contemporary design. However, eventually you may encounter a leak that requires attention. Here's a guide to help you fix a leaking single-handle bathroom faucet in a few steps:
1. Gather Tools and Supplies
Before starting any repairs, it's essential to have the necessary tools and supplies on hand. For fixing a leaking single-handle faucet, you'll need:
- Adjustable wrench
- Phillips screwdriver
- Flathead screwdriver li>Washers (if needed)
- O-rings (if needed)
2. Turn Off Water Supply
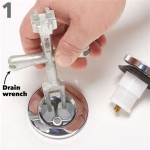
Safety first! Before attempting any repairs, turn off the water supply to the faucet. Locate the shut-off valves beneath the sink or behind the faucet; turn them clockwise to close them completely.
3. Remove Handle
Once the water is turned off, you can remove the handle. Find a small set screw located on the base of the handle; use a Phillips screwdriver to loosen and remove it. Gently pull the handle straight up to detach it from the valve stem.
4. Replace Cartridge
The cartridge is the heart of the faucet; it contains the seals and components that regulate water flow. Most single-handle faucets use a replaceable cartridge. Use a flathead screwdriver to pry the cartridge loose and pull it straight out. Inspect the cartridge and replace it with a new one if damaged or worn.
5. Replace Washers or O-Rings
If replacing the cartridge doesn't solve the leak, you may need to replace the washers or O-rings. Washers are usually located under the handle or cartridge, while O-rings are found around the base of the faucet body. Remove the old washer or O-ring and replace it with a new one of the same size.
6. Reassemble Faucet
Once you've replaced the cartridge or washer/O-rings, it's time to reassemble the faucet. Insert the new cartridge into the valve body, pushing it down until it's securely seated. Place the washer over the cartridge and reattach the handle, tightening the set screw to secure it.
7. Turn On Water Supply and Test
Turn on the water supply and check for leaks. If the leak persists, double-check your connections and tighten any loose components. Run the faucet for a few minutes to ensure there are no further problems.
Tips:
- If you're not comfortable repairing the faucet yourself, call a licensed plumber.
- Regularly check your faucets for leaks and address any issues promptly to prevent größeren Schäden.
- Consider replacing old or worn-out washers and O-rings even if there's no leak, as they can weaken over time.

How To Fix A Leaking Single Handle Bathtub Faucet Quick And Easy

How To Fix A Leaky Single Handle Tub Shower Faucet Danco

How To Fix Leaking Bathtub Faucet

How To Fix A Leaky Moen Faucet Fast And Easy Cartridge Replacement

How To Fix A Leaky Bathroom Sink Faucet

Bathroom My Single Handle Faucet Is Leaking Or Dripping

How To Rebuild A Delta Single Handle Faucet

Is Your Ceramic Disc Faucet Leaking Here S How To Clean Fix It

How To Repair A Single Handle Kitchen Faucet Diy Family Handyman

Repairing A Leaky Single Handle Tub Shower Ball Type Faucet