Replacing A Single Handle Bathroom Faucet - A Comprehensive Guide
Replacing a single handle bathroom faucet may seem like a daunting task, but with the right tools and a little patience, it can be completed in a few hours. By following these step-by-step instructions, you can save yourself the expense of hiring a plumber and ensure that your faucet is installed correctly.
Gather Your Tools and Materials
Before you begin, gather the following tools and materials:
*Turn Off the Water Supply
The first step is to turn off the water supply to the faucet. Locate the shut-off valves under the sink and turn them clockwise until they are completely closed. Open the faucet to release any remaining water.
Disconnect the Water Supply Lines
Use the adjustable wrench to disconnect the water supply lines from the faucet. Be careful not to overtighten the wrench, as this can damage the lines. If the lines are corroded, you may need to replace them.
Remove the Old Faucet
Use the basin wrench to loosen the mounting nut that holds the faucet in place. Once the nut is loose, lift the faucet straight up to remove it. Clean the mounting surface on the sink with a cloth.
Install the New Faucet
Apply a bead of plumber's putty around the base of the new faucet. Place the faucet on the sink and tighten the mounting nut with the basin wrench. Do not overtighten.
Connect the Water Supply Lines
Wrap the threads of the water supply lines with Teflon tape in a clockwise direction. Screw the lines onto the faucet and tighten them with the adjustable wrench. Do not overtighten.
Turn on the Water Supply and Check for Leaks
Turn on the shut-off valves under the sink to restore the water supply. Open the faucet and check for leaks. If there are any leaks, tighten the connections with the adjustable wrench until they stop.
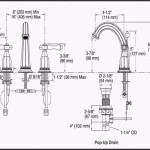
Install the Handle and Trim
Insert the handle into the faucet and secure it with the screw. Install any trim pieces that came with the faucet.
Congratulations! You have successfully replaced your single handle bathroom faucet.

Bathroom My Single Handle Faucet Is Leaking Or Dripping

Single Handle Bathroom Faucet And Drain Replacement Easy Step By Tips For Beginners

How To Rebuild A Delta Single Handle Faucet

How To Replace A Bathroom Faucet

How To Replace Repair A Leaky Moen Cartridge In Bathroom Set Of Faucets Single Lever Tips

Moen Adler 4 Inch Centerset Single Handle Bathroom Faucet Replacement Ifixit Repair Guide

The Plumber Swap Faucet But Save Sink

Valley Single Handle Bathroom Faucet Repair Parts

Valley Single Handle Bathroom Faucet Repair Parts

How To Repair A Single Handle Kitchen Faucet Diy Family Handyman
Related Posts