How To Replace A One Handle Bathroom Faucet
Replacing your bathroom faucet isn't just a job for the pros. It's a simple and straightforward task that you can easily do yourself with the right tools and guidance. Here are the essential steps to help you replace your one handle bathroom faucet in a jiffy.
Gather Your Tools
Before you begin, make sure you have all the necessary tools for the job. You'll need:
- Adjustable wrench or basin wrench
- Phillips head screwdriver
- Allen wrench (if required by your faucet)
- Plumber's putty
- Towels or rags
- Flashlight (optional)
Turn Off the Water Supply
Safety first! Turn off the water supply valves located beneath your sink. Usually, there's one valve for hot water and another for cold water. Turn them clockwise until they're completely closed, ensuring no water will flow when you remove the faucet.
Disconnect Supply Lines
Use your adjustable wrench to disconnect the supply lines from the faucet. Hold the faucet steady with one hand while you loosen the nuts connecting the lines to the faucet body. You may need a flashlight to see better if the space is tight.
Loosen the Mounting Nut
Locate the mounting nut that secures the faucet to the sink or countertop. Using your adjustable wrench, loosen the nut by turning it counterclockwise. Be gentle and don't overtighten it.
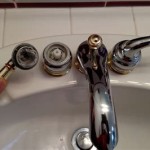
Remove the Handle
Depending on your faucet model, you may need to remove the handle before you can take out the faucet. Check for a small set screw or Allen screw holding the handle in place. Remove it using the appropriate screwdriver or Allen wrench.
Lift Out the Faucet
Once the mounting nut and handle are removed, you can lift the faucet straight up and out of the sink or countertop. Some faucets may have additional screws or clips holding them in place, so check for those and remove them as well.
Clean the Sink Surface
Before installing the new faucet, clean the surface of the sink or countertop where the faucet will sit. Remove any old plumber's putty or debris to ensure a proper seal.
Apply Plumber's Putty
Apply a bead of plumber's putty around the base of the new faucet. This will create a watertight seal between the faucet and the sink or countertop.
Insert the New Faucet
Insert the new faucet into the opening in the sink or countertop. Align it properly and press down firmly to create a good seal. Tighten the mounting nut underneath the sink or countertop, but do not overtighten.
Reattach the Handle
If you removed the handle earlier, reattach it now. Insert the handle onto the faucet stem and secure it with the screw or Allen screw.
Reconnect Supply Lines
Reconnect the supply lines to the new faucet. Hand-tighten the nuts first, then use your adjustable wrench to tighten them further, ensuring they're secure but not overtightened.
Turn On the Water Supply
Slowly turn on the water supply valves located beneath the sink. Check for any leaks around the faucet base or supply lines. If you notice any leaks, tighten the connections further. Run the water to remove any air from the lines.
Congratulations!
You've successfully replaced your one handle bathroom faucet. Give yourself a pat on the back for a job well done.

How To Replace A Bathroom Faucet Moen Single Handle Install

How Do I Replace Bathroom Sink Faucet Handles Cleaning More

How To Replace A Bathroom Faucet Removal And Installation

How To Install A Delta Single Handle Bathroom Sink Faucet Blog

Bathroom Faucet Installation 1 Handle Hole Integrated Lines

How To Replace A Bathroom Faucet Moen Single Handle Install

How To Remove Moen Bathroom Faucet Handle In 2 Steps

How To Remove And Install A Bathroom Faucet

Diy How To Replace A Bathroom Sink Faucet Remove Install

How To Disassemble A Pfister Bathroom Faucet Bargain
Related Posts