Replacing Drain Pipes Under Bathroom Sink: A Comprehensive Guide
Replacing drain pipes under a bathroom sink is a plumbing task that requires some basic knowledge and skills. Whether you're experiencing leaks, clogs, or corrosion, it's essential to address these issues promptly to prevent further damage. This comprehensive guide will provide you with a step-by-step approach to successfully replace drain pipes under your bathroom sink.
Required Tools and Materials
Before starting, gather the necessary tools and materials:
- Adjustable wrench
- Plumber's putty
- Teflon tape
- Slip joint pliers
- Bucket
- New drain pipes (matching the size and type of the existing ones)
- Basin wrench (optional)
- Flashlight (optional)
Safety Precautions
Take the following safety precautions before starting:
- Turn off the water supply under the sink.
- Wear work gloves and eye protection.
- Place a bucket under the sink to catch any water.
- Open a window for ventilation if using any chemical cleaners.
Step-by-Step Guide
1. Remove the Old Drain Pipes
Use an adjustable wrench to loosen and remove the nuts connecting the drain pipes to the sink drain and the p-trap. Disconnect the pipes carefully and discard them.
2. Clean the Drain Opening and P-Trap
Use a rag or brush to remove any debris or old putty from the sink drain opening and the p-trap. Wipe them clean with a wet cloth.
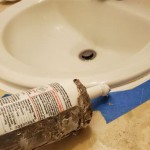
3. Apply Plumber's Putty
Roll out a small piece of plumber's putty into a rope and apply it around the base of the new sink drain (the part that goes into the drain opening). Make sure the putty is smooth and even, creating a watertight seal.
4. Install the New Sink Drain
Align the new sink drain with the drain opening and insert it carefully. Tighten the drain nut by hand and then use an adjustable wrench to fully secure it. Do not overtighten.
5. Wrap Teflon Tape
Apply Teflon tape in a clockwise direction around the threads of the p-trap connector that will connect to the sink drain. Wrap it tightly, overlapping each layer slightly for about 3-4 turns.
6. Install the P-Trap
Connect the p-trap to the sink drain by hand-tightening the connector. Use slip joint pliers to further tighten it, ensuring a snug fit but being careful not to damage the plastic parts.
7. Connect to the Drain Pipe
Connect the other end of the p-trap to the drain pipe using the same technique as in step 6. Tighten the connection securely.
8. Test for Leaks
Turn on the water supply and let the water run through the sink for a few minutes. Check for any leaks at the connections. Tighten any loose connections as needed.
Tips
- If you encounter any stubborn nuts, use a penetrating lubricant to loosen them.
- Use a flashlight to inspect hard-to-reach areas for corrosion or damage.
- If you're replacing a metal drain pipe, consider replacing it with a flexible plastic pipe, which is less likely to corrode or clog.
- If you're unsure about any step, consult a qualified plumber for assistance.
Conclusion
Replacing drain pipes under a bathroom sink can be a challenging task, but it's manageable with the right tools, materials, and a systematic approach. By following the steps outlined in this article, you can effectively replace your drain pipes and restore the proper functioning of your bathroom sink.

Bathroom Sink Drain Leaking Around Threads Premier Plumbing Inc

How To Install A Pipe From Sink Drain Wall Ehow

How To Install P Trap And Bathroom Sink Drain Piping Easy Installation For Beginners

How To Fix Or Replace A Leaky Sink Trap Hometips

How To Change J Pipe Under A Bathroom Sink Ehow

How To Fix A Leaking Bathroom Sink Paschal Air Plumbing Electric

How To Install Bathroom Sink Drain Queen Bee Of Honey Dos

Bathroom Sink Drain Leaking Around Threads Premier Plumbing Inc

Bathroom Sink Plumbing Installation Diy Montreal

Replace A Trap And Add Cleanout Fine Homebuilding
Related Posts