Essential Aspects of Dismantling a Bathroom Faucet Handle
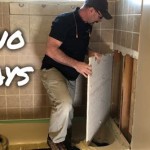
Maintaining a bathroom faucet involves occasional repairs, and one of the most common is taking apart the handle. Whether you face a dripping faucet or a malfunctioning handle, understanding the process of disassembly is crucial. This guide provides a comprehensive overview of the essential steps involved in disassembling a bathroom faucet handle, ensuring a smooth and effective repair process.
### Identifying the Handle TypeBefore embarking on the disassembly process, it's essential to determine the type of faucet handle you have. Common handle types include:
- Single-lever
- Two-handle
- Pull-out
- Push-button
Each handle type has its unique disassembly procedure, so identifying it beforehand is crucial.
### Materials and Tools RequiredTo disassemble a bathroom faucet handle, you will need:
- Screwdriver (Phillips or flathead, depending on the handle type)
- Allen wrench (if required)
- Pliers (optional)
- Clean rags or cloth
Prior to disassembly, ensure the following safety precautions:
- Turn off the water supply to the faucet.
- Open the faucet to release any residual water.
- Wear gloves and eye protection to prevent contact with water and debris.
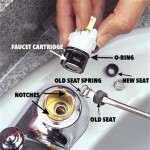
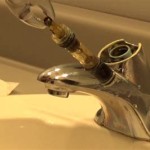
- Remove the decorative cap on the handle.
- Use a screwdriver to remove the screw underneath the cap.
- Gently pull the handle straight up to detach it from the cartridge.
- Turn off the hot and cold water valves.
- Remove the handle caps.
- Use a screwdriver to remove the screws holding the handles in place.
- Lift the handles off the stems.
- Pull out the spray head to its full extent.
- Locate the release button or lever and press it.
- Pull the handle straight up to detach it from the faucet.
- Locate the small hole on the top of the handle.
- Insert a small object (such as a paperclip) into the hole and press it.
- While pressing the button, pull the handle straight up to detach it from the faucet.
Disassembling a bathroom faucet handle is a relatively straightforward process with the right tools and know-how. By following these essential steps, you can effectively identify the handle type, gather the necessary materials, take appropriate safety precautions, and successfully disassemble the handle for repair or replacement. Remember, if you encounter any difficulties or have any concerns, do not hesitate to consult with a licensed plumber for professional assistance.

How Do I Replace Bathroom Sink Faucet Handles Cleaning More

How To Remove Moen Bathroom Faucet Handle In 2 Steps

How To Remove And Install A Bathroom Faucet

Tighten A Loose Lever On Moen Brantford Faucet

Kohler Faucet Replace Spline Insert

How To Tighten Faucet Handle Homeserve Usa

How To Fix A Leaking Faucet Without In The Handle Moen

Moen Faucet Stuck How To Remove A Monticello Tools For Removing Bathroom Facuet

How To Remove Moen Bathroom Sink Faucet Handles Faucets

How To Repair A Single Handle Kitchen Faucet Diy Family Handyman
Related Posts