How to Plumb a Bathroom Sink Waste
The essential aspects of how to plumb a bathroom sink waste are: determining the type of sink waste, gathering the necessary tools and materials, understanding the plumbing code, preparing the work area, assembling the waste assembly, connecting the waste assembly to the drainpipe, and testing for leaks.
A bathroom sink waste is the plumbing that drains water from the sink. It consists of a drainpipe, a strainer, a P-trap, and a waste assembly. The drainpipe connects the sink to the main drain line. The strainer catches hair and other debris that could clog the drainpipe. The P-trap prevents sewer gases from entering the bathroom. The waste assembly connects the P-trap to the drainpipe.
Before starting, determine the type of sink waste you have. There are two main types: slip joint and compression. Slip joint wastes have a rubber gasket that seals the connection between the P-trap and the drainpipe. Compression wastes use a metal washer to seal the connection. Once you know the type of waste you have, gather the necessary tools and materials.
It is important to understand the plumbing code in your area before you start working. The plumbing code will tell you what type of materials you can use and how to install them. Once you have gathered the necessary tools and materials and understand the plumbing code, you can prepare the work area.
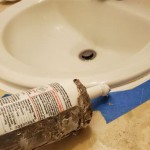
To prepare the work area, turn off the water supply to the sink. Then, remove the old waste assembly. If the old waste assembly is slip joint, simply loosen the nuts that hold the P-trap to the drainpipe and the waste assembly to the P-trap. If the old waste assembly is compression, you will need to use a wrench to loosen the nuts.
Once the old waste assembly is removed, you can assemble the new waste assembly. To assemble the waste assembly, first, insert the rubber gasket into the P-trap. Then, screw the P-trap onto the drainpipe. Next, insert the waste assembly into the P-trap. Finally, tighten the nuts that hold the waste assembly in place.
Once the waste assembly is assembled, you can connect it to the drainpipe. To connect the waste assembly to the drainpipe, simply insert the drainpipe into the waste assembly and tighten the nuts that hold the drainpipe in place.
Once the waste assembly is connected to the drainpipe, you can test for leaks. To test for leaks, turn on the water supply to the sink and look for any leaks around the waste assembly. If there are any leaks, tighten the nuts that hold the waste assembly in place until the leaks stop.

How To Plumb A Bathroom With Multiple Plumbing Diagrams Hammerpedia

Bathroom Sink Plumbing

How To Plumb A Drain Sink Pipes

How To Install Bathroom Sink Drain Queen Bee Of Honey Dos

How To Plumb A Bathroom With Multiple Plumbing Diagrams Hammerpedia

How To Install A Pipe From Sink Drain Wall Ehow

Simple Ways To Fit A Sink Waste Pipe With Pictures Wikihow

How To Fit A Bathroom Sink Diy Guides Victorian Plumbing

How To Plumb A Drain Sink Pipes

Bathroom Sink Plumbing Installation Diy Montreal
Related Posts