Stop a Dripping Bathroom Sink Faucet
A dripping faucet is not only annoying but also wasteful, costing you money on your water bill. Fortunately, fixing a leaky bathroom faucet is usually a simple task. In this article, we will discuss the essential aspects of stopping a dripping faucet.
1. Identify the Source of the Drip
The first step in stopping a dripping faucet is to identify the source of the leak. There are four main areas where a leak can occur: the washer, the O-ring, the packing nut, or the valve seat. To determine the source of the leak, turn on the faucet and observe where the water is coming from.
2. Gather the Necessary Tools
Once you have identified the source of the leak, you will need to gather the necessary tools to fix it. The tools you will need will vary depending on the type of faucet you have. However, most repairs will require a wrench, a screwdriver, and a pair of pliers.
3. Turn Off the Water Supply
Before you begin making any repairs, it is important to turn off the water supply to the faucet. This will prevent you from getting wet and will also make it easier to work on the faucet.
4. Disassemble the Faucet
Once the water supply is turned off, you can begin disassembling the faucet. The steps for disassembling a faucet will vary depending on the type of faucet you have. However, most faucets can be disassembled by removing the aerator, the handle, and the packing nut.
5. Replace the Worn Parts
Once you have disassembled the faucet, you will need to replace the worn parts. The parts that you will need to replace will vary depending on the source of the leak. However, the most common parts that need to be replaced are the washer, the O-ring, the packing nut, and the valve seat.
6. Reassemble the Faucet
Once you have replaced the worn parts, you can reassemble the faucet. The steps for reassembling a faucet will vary depending on the type of faucet you have. However, most faucets can be reassembled by reversing the steps that you used to disassemble them.
7. Turn On the Water Supply
Once the faucet is reassembled, you can turn on the water supply. Check for leaks and make sure that the faucet is working properly. If there are any leaks, you may need to tighten the packing nut or replace the washer.

Properly Fixing A Leaky Sink Faucet Wallside Windows

5 Reasons Your Faucet Is Dripping Water How To Fix It

How To Fix A Leaky Faucet The Home Depot

5 Reasons Your Faucet Is Dripping Water How To Fix It

Part 1 Of 2 How To Fix A Dripping Faucet

Water Dripping From Faucet Why And How To Fix

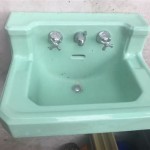
How To Fix A Leaky Bathroom Sink Faucet

How To Fix A Leaky Faucet True Value

Four Reasons Why Your Faucet Won T Stop Dripping Service Plus Plumbing

Part 1 Of 2 How To Fix A Dripping Faucet
Related Posts