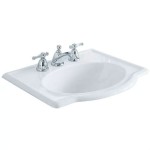
Typical Bathroom Sink Plumbing Diagram
Understanding the plumbing behind a common bathroom sink can empower homeowners to tackle minor repairs and maintenance tasks. A seemingly simple fixture, the bathroom sink relies on a network of pipes, valves, and connections to function correctly. This article provides a comprehensive overview of a typical bathroom sink plumbing diagram, demystifying the system for the average homeowner.
Water Supply Lines
Clean water arrives at the bathroom sink through two separate supply lines, one for hot water and one for cold. These lines typically branch off from the main water supply line and are usually made of copper, CPVC, or PEX piping. Each supply line connects to a shut-off valve located beneath the sink. These valves allow users to isolate the water supply to the sink for repairs or replacements without shutting off the water to the entire house. Understanding the placement and function of these shut-off valves is crucial for preventing water damage in case of leaks or other plumbing issues. From the shut-off valves, smaller flexible supply lines, often braided stainless steel, connect to the inlets of the faucet.
The Faucet
The faucet plays a central role in regulating the flow and temperature of the water delivered to the sink basin. Modern faucets employ either a cartridge, ball, or ceramic disc mechanism to mix hot and cold water and control the flow rate. Cartridge faucets utilize a replaceable cartridge containing all the moving parts, while ball faucets utilize a rotating ball with chambers and ports to control water flow and temperature. Ceramic disc faucets rely on two precisely ground ceramic discs to control the flow and mixing of water. Regardless of the internal mechanism, the faucet body features separate inlets for hot and cold water and a single outlet spout for the mixed water.
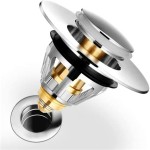
The Drain Assembly
The drain assembly comprises several components working together to direct wastewater away from the sink. The most visible component is the strainer body, located at the bottom of the sink basin. This strainer prevents large debris from entering the drain pipes. Beneath the sink, a tailpiece connects the strainer body to the P-trap. The P-trap, a U-shaped section of pipe, is a vital component of the plumbing system. It holds a small amount of water, forming a seal that prevents sewer gases from entering the bathroom through the drain. The curved shape of the P-trap also traps small objects that may accidentally fall down the drain, preventing clogs further down the line. From the P-trap, the drain line connects to the main waste stack, directing wastewater to the sewer or septic system.
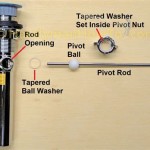
The Pop-Up Assembly
Many modern bathroom sinks feature a pop-up drain assembly, allowing users to easily close the drain opening to fill the basin with water. This assembly consists of a pivot rod, a lift rod, and a stopper. The pivot rod, located within the drainpipe behind the faucet, connects to the lift rod, which extends through the faucet body. When the lift rod is pulled up, it raises the stopper, closing the drain. Pushing the lift rod down lowers the stopper, opening the drain. This mechanism provides a convenient way to control the flow of water out of the sink.
Vent Piping
Although not directly visible beneath the sink, vent piping plays a crucial role in the proper functioning of the drain system. The vent pipe connects to the drain line and runs vertically to the roof of the building. Its primary function is to equalize pressure within the drain system, preventing the formation of vacuums that can slow or stop drainage. The vent pipe also allows sewer gases to safely escape to the outside, preventing them from building up within the plumbing system. Proper venting ensures smooth, efficient drainage and prevents gurgling sounds or slow draining issues.
Maintenance and Troubleshooting
Understanding the components of a typical bathroom sink plumbing diagram can assist in identifying and resolving common issues. Slow drainage may indicate a clogged P-trap, while drips from the faucet may require replacement of a cartridge or other internal components. Familiarizing oneself with the layout of the pipes, valves, and connections empowers homeowners to perform basic maintenance tasks, such as tightening loose connections or clearing minor clogs. Regular inspection of the plumbing system can prevent more significant problems and ensure the longevity of the bathroom sink fixtures.

Bathroom Sink Plumbing

Index Php 550 396 Bathroom Plumbing Diy Installation

How To Plumb A Bathroom With Multiple Plumbing Diagrams Hammerpedia

Half Bath Layout In Triplex Plumbing Drawing Washing Machine Drain Hose

Pin On Diagram
:strip_icc()/SCP_173_04-a5f887244add47e48d7a24d0579341d7.jpg?strip=all "The Ultimate Guide To Bathroom Plumbing Diagrams And Layouts")
The Ultimate Guide To Bathroom Plumbing Diagrams And Layouts

Figuring Out Your Drain Waste Vent Lines Dummies

A Vessel Sink Conversion Fine Homebuilding

How To Plumb A Bathroom With Multiple Plumbing Diagrams Hammerpedia

How To Vent A Toilet Sink And Shower Drain
Related Posts