Remove Delta Bathroom Sink Faucet Handle: Essential Aspects
Maintaining bathroom fixtures like faucets is crucial for a functional and aesthetically pleasing space. Among the common issues that may arise, removing the handle of a Delta bathroom sink faucet is a task that requires a clear understanding of its essential aspects. Whether you're tackling the replacement of a worn-out handle or addressing a problem with the water flow, knowing the right steps and tools is paramount.
This comprehensive guide will delve into the key aspects of removing a Delta bathroom sink faucet handle, ensuring that the process is carried out effectively and efficiently. By understanding the anatomy of the faucet and the tools required, you can approach this task with confidence and restore your faucet to optimal functionality.
Tools Required
- Philips head screwdriver
- Adjustable wrench or Allen key
- Pliers (optional)
- Cloth or paper towels
Step-by-Step Guide
- Turn off the water supply: Locate the water supply valves beneath the sink and turn them clockwise to shut off the water flow.
- Remove the aerator: Using pliers or your fingers, unscrew the aerator attached to the faucet spout.
- Locate the set screw: Inspect the base of the faucet handle and find the small set screw. This screw secures the handle to the faucet assembly.
- Loosen the set screw: Using the appropriate screwdriver or Allen key, carefully loosen the set screw by turning it counterclockwise.
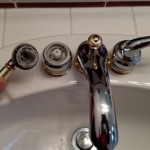
- Remove the handle: Once the set screw is loose, gently pull the handle straight up to detach it from the faucet body.
Troubleshooting Common Issues
- Stuck handle: If the handle is stuck due to mineral deposits or corrosion, apply a penetrating lubricant to the set screw and allow it to penetrate for a few minutes before attempting to loosen it.
- Loose cartridge: Ensure that the cartridge, located beneath the handle, is properly tightened. Tighten the cartridge nut using an adjustable wrench.
- Water leakage: If water is leaking from the base of the handle after reassembly, replace the O-rings or washers to create a watertight seal.
Conclusion
Removing a Delta bathroom sink faucet handle is a straightforward task that requires proper tools and a systematic approach. By understanding the essential aspects outlined in this guide, you can effectively address this issue, restore your faucet's functionality, and maintain a well-maintained bathroom space.

Tips Tricks Remove Delta 2 Handle 4 In Bathroom Sink Faucet With Bar 5 21 18

How To Fix Leaky Bathroom Handle Delta Faucet Model 4530 Series Hard Water

How To Rebuild A Delta Single Handle Faucet

How Do I Replace Bathroom Sink Faucet Handles Cleaning More

How To Replace A Two Handle Faucet Delta Blog

Tips Tricks Remove Delta 2 Handle 4 In Bathroom Sink Faucet With Bar 5 21 18

How To Fix A Leaky Delta Two Handle Faucet

Simple Ways To Fix A Leaky Delta Bathroom Sink Faucet

Simple Ways To Fix A Leaky Delta Bathroom Sink Faucet

How To Fix A Leaking Faucet Handle Replacing Stem Assembly
Related Posts