Caulking a Bathroom Sink: A Guide to Essential Techniques
Caulking your bathroom sink is a crucial step in preventing water damage and maintaining a clean and sanitary environment. Here's a comprehensive guide to the essential aspects of caulking a bathroom sink:
Step 1: Preparation
Before applying caulk, thoroughly clean the surface around the sink. Remove dirt, debris, and old caulk using a cleaning solution and a scrub brush. Allow the area to dry completely.
Step 2: Choose the Right Caulk
Select a caulk specifically designed for bathroom use, such as silicone caulk or acrylic latex caulk. Silicone caulk is more flexible and durable, while acrylic latex caulk is easier to apply and remove.
Step 3: Apply Backer Rod (Optional)
If the gap between the sink and the wall or countertop is wider than 1/4 inch, consider using a backer rod. This foam or rubber rod fills the gap, reducing the amount of caulk needed and preventing the caulk from sinking too deeply.
Step 4: Apply Caulk
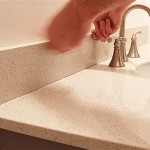
Cut the caulk tube at a 45-degree angle and insert it into a caulk gun. Slowly and evenly apply a bead of caulk along the joint between the sink and the surrounding surfaces. Use a steady hand and apply consistent pressure.
Step 5: Tool the Caulk
Smooth the applied caulk using a wet finger or a caulk-tooling tool. Gently press down on the caulk, ensuring it fills all gaps and creates a watertight seal. Remove excess caulk with a damp sponge.
Step 6: Remove Excess Caulk (Optional)
For a professional finish, use a damp cloth to wipe away any excess caulk that may have oozed out of the joint. Avoid using sharp objects or chemicals to remove the excess, as this can damage the caulk or surrounding surfaces.
Step 7: Allow to Cure
Follow the manufacturer's instructions for the caulk's recommended curing time. Typically, silicone caulk takes 12-24 hours to cure fully, while acrylic latex caulk cures in 4-8 hours. Avoid using the sink or exposing it to water during this time.
Maintenance and Tips
To ensure the longevity of your caulk, regularly inspect it for cracks or deterioration. If necessary, remove the old caulk and re-apply a new bead. Additionally, avoid using harsh cleaners or abrasive tools near the caulk, as these can damage it.

How To Re Caulk A Bathroom Sink Ifixit Repair Guide

Here S How To Caulk Around Bathroom And Kitchen Fixtures

How To Caulk A Bathroom Sink 12 Steps With Pictures Wikihow

How To Caulk A Bathroom Sink 12 Steps With Pictures Wikihow

Pin On Home Decor Organization

How To Caulk A Bathroom Sink

How To Caulk A Bathroom Sink 12 Steps With Pictures Wikihow

How To Re Caulk A Sink

How To Clean Remove Reapply Caulk In Kitchens And Bathrooms

How To Caulk Like A Professional The Home Depot
Related Posts