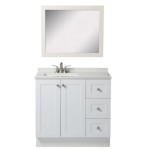
How To Fix Leaky Delta Faucet Bathroom
Maintaining a functioning and leak-free faucet is crucial for both water conservation and overall bathroom cleanliness. Leaky faucets can lead to water wastage, increased water bills, and potential damage to your bathroom fixtures and surroundings. When it comes to bathroom faucets, Delta is a renowned brand known for its durability and reliability. However, even Delta faucets can develop leaks over time due to various reasons, such as worn-out components, improper installation, or mineral buildup.
Addressing a leaky Delta faucet bathroom promptly is essential to prevent further issues and water wastage. By understanding the common causes of leaks and following the appropriate repair steps, you can effectively fix the problem and restore your faucet to its optimal functioning.
### Essential Aspects of Fixing a Leaky Delta Faucet Bathroom1. Identifying the Source of the Leak
Before attempting any repairs, it's crucial to determine the precise location and source of the leak. Carefully inspect the faucet, including the handle, spout, and base, to pinpoint the area where water is escaping.
2. Preparing for the Repair
Once the source of the leak is identified, gather the necessary tools and replacement parts. For most Delta faucet repairs, you'll typically need a screwdriver, wrench, pliers, and replacement parts such as washers, O-rings, or cartridges.
3. Shutting Off the Water Supply
Before starting any repairs, it's essential to shut off the water supply to the faucet. Locate the shut-off valves beneath the sink or behind the faucet and turn them clockwise to close them completely.
4. Disassembling the Faucet
Depending on the location of the leak, you may need to disassemble the faucet to access the affected components. Follow the manufacturer's instructions or refer to online resources for specific disassembly instructions for your Delta faucet model.
5. Replacing Worn-Out Components
Once the faucet is disassembled, inspect the components for signs of wear or damage. Replace any worn-out washers, O-rings, or cartridges with new ones, ensuring they are the correct size and type for your specific Delta faucet model.
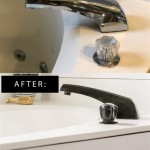
6. Reassembling the Faucet
After replacing the required components, carefully reassemble the faucet, following the manufacturer's instructions in reverse order. Tighten all screws and connections securely to prevent future leaks.
7. Turning on the Water Supply and Testing
Once the faucet is reassembled, turn on the water supply and check for any remaining leaks. If the leak has been successfully fixed, the faucet should operate smoothly and without any signs of water dripping or leaking.

How To Repair Leaking Dripping Delta Faucet Diyplumbing Serviceplumbing Tappplumbing

Simple Ways To Fix A Leaky Delta Bathroom Sink Faucet

How To Fix A Leaky Delta Style Bathroom Faucet

How To Fix Leaky Bathroom Handle Delta Faucet Model 4530 Series Hard Water

Simple Ways To Fix A Leaky Delta Bathroom Sink Faucet

Sink Faucet Repair Delta Bathroom Drips

Simple Ways To Fix A Leaky Delta Bathroom Sink Faucet

Simple Ways To Fix A Leaky Delta Bathroom Sink Faucet

How To Fix A Leaky Delta Two Handle Faucet

Simple Ways To Fix A Leaky Delta Bathroom Sink Faucet
Related Posts