Replacing Bathroom Sink Water Valves: A Comprehensive Guide
Replacing bathroom sink water valves is a fundamental plumbing task that can save you a significant amount of money on repairs. Leaky or faulty valves can lead to wasted water, increased water bills, and potential water damage. By following these step-by-step instructions, you can effectively replace your bathroom sink water valves, ensuring the proper functioning of your plumbing system.
Step 1: Gather Necessary Materials
Before starting the replacement process, ensure you have all the necessary materials on hand:
- New water valves compatible with your bathroom sink
- Adjustable wrench or pliers
- Plumbers tape
- Bucket or towel
- Flashlight (optional)
Step 2: Shut Off Water Supply
Locate the main water shut-off valve for your home or the shut-off valves beneath the bathroom sink. Turn the valves clockwise to close them, effectively stopping water flow to the sink.
Step 3: Open Sink Faucets
Turn on both hot and cold water faucets in the sink to release any remaining water pressure in the pipes.
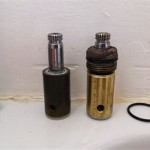
Step 4: Remove Old Valves
Using the adjustable wrench or pliers, loosen the nuts that hold the old water valves in place.
- Hold the valve body with one hand while loosening the nut.
- If there is limited space, use a flashlight to illuminate the work area.
Step 5: Apply Plumbers Tape
Wrap a few layers of plumbers tape clockwise around the threads of the new water valves. This will help create a watertight seal.
Step 6: Install New Valves
Hand-tighten the new water valves into place. Avoid overtightening, as this could damage the valves or the sink.
Step 7: Tighten Nuts
Using the adjustable wrench or pliers, tighten the nuts that secure the new water valves.
Step 8: Turn on Water Supply
Open the main water shut-off valve or the shut-off valves beneath the bathroom sink to restore water flow.
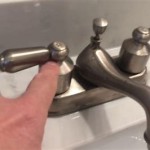
Step 9: Check for Leaks
Turn on the sink faucets and observe if there are any leaks around the newly installed water valves. If you notice any leaks, tighten the nuts further or re-wrap the threads with plumbers tape.
Step 10: Adjust Water Temperature (Optional)
The two water valves control the temperature of the water coming out of the sink faucet. If necessary, adjust the valves to achieve the desired water temperature.

How To Install Water Shut Off Valve For Sinks

How To Replace A Leaking Shutoff Valve Under Sink

How To Replace A Shutoff Valve Diy Family Handyman

How To Replace A Flowtite Push Pull Valve With Standard Shut Off For Dishwasher

How To Replace A Bathroom Faucet Home Repair Tutor

How To Replace A Faucet Howstuffworks

How To Replace Shutoff Valve Under Bathroom Sink

Stop Plumbing Leaks With Ball Type Shutoff Valves Diy Family Handyman

How To Install A New Bathroom Water Supply Shutoff Valve

How To Install A Vessel Sink Faucet