How to Fit Bathroom Mixer Taps
Bathroom mixer taps, also known as single-lever taps, are a popular choice for modern bathroom installations. They provide a sleek and contemporary look, offer precise temperature control, and are generally easier to use than traditional two-tap systems. Installing bathroom mixer taps is a relatively straightforward DIY project, but it requires careful attention to detail and some basic plumbing knowledge. This article provides a comprehensive guide to fitting these taps, covering the essential steps and crucial considerations.
1. Preparation and Tools
Before embarking on the installation process, you need to gather the necessary tools and materials. This includes:
- New bathroom mixer tap set
- Adjustable wrench
- Basin wrench
- Pipe wrenches (various sizes)
- Tape measure
- Level
- Pliers
- Screwdriver
- Teflon tape
- Silicone sealant
- Bucket
- Rag
- Safety goggles
- Gloves
Ensure you have all the necessary tools and materials before starting the installation. The specific tools and materials may vary depending on the type of mixer tap, but the list above provides a general guideline. It’s also recommended to consult the manufacturer’s instructions for specific recommendations and warnings.
2. Shut Off the Water Supply
The first and most crucial step is to shut off the water supply to the bathroom. Locate the shut-off valves for both the hot and cold water lines. These valves are usually found under the sink or behind the wall. Turn these valves clockwise to close them completely.
It is essential to confirm that the water supply is completely shut off by attempting to run the existing taps. If the water flow has ceased, you can proceed with the installation. If there is still water flow, check the shut-off valves again to ensure they are tightly closed. Failure to shut off the water supply completely could result in flooding and damage.
3. Dismantle the Old Taps
Once the water supply is shut off, you can dismantle the old taps. This involves removing the old taps from the sink or wall using tools like adjustable wrenches, pipe wrenches, and basin wrenches.
Carefully loosen the nuts that hold the taps in place. If the nuts are stubborn, use a pipe wrench to grip them firmly. If the old taps are rusted or stuck, you might need to spray them with penetrating oil or use a plumber's wrench for more leverage. Be careful not to damage the sink or wall while removing the old taps.
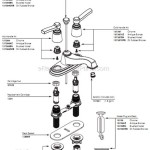
4. Install the New Mixer Taps
With the old taps removed, you can now install the new mixer taps. This process is typically more straightforward than removing the old taps, but it still requires careful attention. Before starting the installation, carefully read the manufacturer's instructions. These instructions will provide detailed information about the specific installation process for your chosen mixer tap model.
Generally, the installation process involves the following steps:
- Install the mounting plate: For some mixer taps, a mounting plate is required. The plate is typically attached to the sink or wall using screws or clips. Make sure the plate is level and secure before proceeding.
- Attach the tap body: Once the mounting plate is installed, attach the tap body to the plate. This involves tightening the nuts that secure the tap to the plate. Make sure the tap is aligned correctly and level before tightening the nuts fully.
- Connect the supply lines: The next step is to connect the supply lines to the mixer tap. The supply lines are typically made of braided stainless steel or flexible plastic. Connect the hot and cold water lines to the appropriate inlets on the tap body. Wrap Teflon tape around the threads on the supply lines before connecting them to the tap to prevent leaks. Tighten the connections securely using adjustable wrenches.
- Connect the drain: Some mixer taps have a built-in drain. If so, connect the drain to the tap body using a threaded adapter. The drain is typically connected to the waste pipe.
- Secure the tap: Finally, secure the mixer tap to the sink or wall using the provided screws or clips. Make sure the tap is level and securely attached before tightening the screws or clips.
5. Test and Finish
After installing the mixer tap, it is crucial to test it thoroughly for leaks and proper functionality. Carefully turn the water supply back on and observe the tap for any signs of leaks. If you detect any leaks, carefully tighten the connection points again or check for any loose connections.
Next, test the tap's functionality by turning the handle to control the water flow and temperature. Ensure that the tap can provide both hot and cold water and that the temperature can be adjusted smoothly. If the tap fails to function correctly, check all connections and ensure the supply lines are connected to the correct inlets on the tap body.
Once you are satisfied that the tap is working correctly, you can finish the installation by cleaning up any excess silicone sealant, debris, or water spills. It is also a good idea to test the tap again after a few hours to ensure that no leaks have developed after the initial installation.

How To Install A Bath Shower Mixer Tap Cartridge User Guide

Bath How To Install A Basin Mixer Tap User Guide

How To Fit Wall Mounted Traditional Bathroom Taps

How To Fit Basin Mixer Taps Change Alterna Bristan Valea Install

How To Fit Bath Taps Step By Instructions Victoriaplum Com

How To Fit A Basin Mixer Tap Victoriaplum Com

How To Fit A Basin Mixer Tap Step By Guide Luna Spas
Fitting A Bathroom Basin Tap The Diy

How To Easily Replace Bath Taps Step By Victorian Plumbing

How To Change A Washer On Mixer Tap Living By Homeserve