Delta Bathroom Faucet Repair: Two Handle Cartridge Replacement
Leaky faucets are a common household problem, and Delta bathroom faucets are no exception. While Delta faucets are known for their quality and durability, even the best fixtures can eventually experience wear and tear, leading to issues such as drips, leaks, or difficulty getting the water to turn on or off. One of the most common causes for these problems is a worn-out cartridge. Thankfully, replacing the cartridge is a relatively simple DIY repair that can restore your faucet to its former glory.
This article will guide you through the process of replacing a two-handle cartridge in a Delta bathroom faucet. While the specific steps may vary slightly depending on your faucet model, the general procedure remains the same. With the right tools and a little patience, you can tackle this repair yourself and save money on professional plumbing services.
Understanding the Two-Handle Cartridge
A two-handle cartridge is the heart of your Delta bathroom faucet. It is a small, cylindrical component that controls the flow of water and adjusts the temperature. It consists of two main parts: a stem, which is connected to the handle, and a valve, which regulates the water flow and seals the faucet. Over time, the internal components of the cartridge can become worn or damaged, leading to leaks, drips, or difficulty in controlling the water flow.
The cartridge is typically held in place by a retaining nut, which can be accessed by removing a decorative escutcheon plate. Replacing the cartridge involves removing the old cartridge and installing a new one in its place.
Tools and Materials
Before you begin, gather the necessary tools and materials. You will need:
- A Phillips head screwdriver
- A pair of adjustable pliers or a wrench
- A basin wrench (optional, but highly recommended)
- A new Delta two-handle cartridge (matching the model of your faucet)
- A small towel or cloth to absorb any drips or spills
- Optional: Plumbers’ grease or Teflon tape for sealing the new cartridge
Replacing the Two-Handle Cartridge
Now that you have everything you need, follow these steps to replace the two-handle cartridge:
- Turn off the water supply: Locate the shut-off valves for your bathroom faucet and turn them off. You can usually find these valves under the sink or on the wall behind the faucet.
- Drain the faucet: Turn on the faucet briefly to drain any remaining water from the lines. This will prevent water from spilling out when you remove the cartridge.
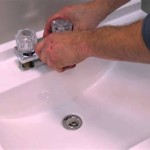
- Remove the handle and escutcheon plate: Using your Phillips head screwdriver, unscrew and remove the handle. Beneath the handle, you will find the escutcheon plate, which is a decorative cover that hides the cartridge retaining nut. Remove the escutcheon plate by unscrewing its screws.
- Remove the retaining nut: With the escutcheon plate removed, you will see the cartridge retaining nut. Use adjustable pliers or a wrench to loosen and remove the retaining nut. If the nut is difficult to reach, you may find a basin wrench helpful.
- Remove the old cartridge: Once the retaining nut is removed, the old cartridge should lift out easily.
- Inspect the cartridge: Before installing the new cartridge, take a moment to inspect the old one. Note the position of the wear marks on the old cartridge. This will help you determine if the new cartridge is installed correctly.
- Install the new cartridge: Apply a thin layer of plumbers’ grease or Teflon tape to the threads of the new cartridge. This will help to prevent leaks. Align the new cartridge with the wear marks on the old one and push it into place. Make sure it is seated properly.
- Reinstall the retaining nut: Place the retaining nut back on the cartridge and tighten it securely with adjustable pliers or a wrench.
- Reinstall the escutcheon plate: Replace the escutcheon plate by screwing it back on.
- Reinstall the handle: Place the handle back on the stem and tighten it securely.
- Turn on the water supply: Turn on the water supply and check for leaks. If there are any leaks, re-tighten the retaining nut or check the installation of the cartridge.
Troubleshooting Common Issues
While replacing the cartridge is a relatively simple repair, you may encounter some issues along the way. Here are some common problems and how to address them:
- Difficulty removing the retaining nut: If the retaining nut is stuck, try using a pipe wrench. If that doesn’t work, you may need to use a penetrating oil to loosen the nut.
- Leaking cartridge: If the new cartridge is leaking, make sure it is seated properly and tighten the retaining nut securely. If the leak persists, you may need to replace the cartridge again or check for other potential leaks.
- Incorrect cartridge: Ensure you have the correct cartridge for your faucet model. You can find the cartridge model number on the old cartridge or on the Delta website.
By following these steps and troubleshooting any issues, you can successfully replace a two-handle cartridge on a Delta bathroom faucet. This DIY repair can save you money on professional plumbing services and is a great way to learn about your home’s plumbing systems. If you are unsure about any part of the repair process or encounter difficulties, it is best to contact a licensed plumber for assistance.

Two Handle Cartridges Delta Faucet

Plumb Delta Rless Cartridge Faucet Repair Kit 2 Handle 1 Pk Canadian Tire

How To Fix Leaky Bathroom Handle Delta Faucet Model 4530 Series Hard Water

Danco Metal Faucet Repair Kit Delta Delex In The Kits Components Department At Com

2 Pack Flowrite Stem Kit Delta Faucet Rp1740 Two Handle Repair For

Plumb Delta Brass Oem Faucet Cartridge With 1 4 In Turn Stop Canadian Tire

Delta Faucet Cartridge Repair

Delta Hot Cold Brass Stem Assembly For Faucets Rp25513 The Home Depot

2 Pack Flowrite Stem Kit Delta Faucet Rp1740 Two Handle Repair For

Repair Parts For One And Two Handle Delta Bathroom Faucets
Related Posts