How to Remove a Bathroom Counter and Sink
Replacing a bathroom counter and sink is a fairly straightforward project that can be completed in a day. However, it's important to take the time to plan ahead and gather all the necessary tools and materials before you get started.
Tools and Materials You'll Need
*- Adjustable wrench
- Phillips head screwdriver
- Flat head screwdriver
- Putty knife
- Hammer
- Pry bar
- Caulk gun
- New counter and sink
- Shims
- Level
- Caulk
Step-by-Step Instructions
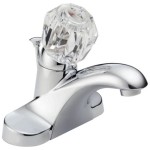
- Turn off the water supply to the sink. This is usually done by turning the valves located under the sink. Once the water is turned off, open the faucet to release any remaining water in the lines.
- Disconnect the water supply lines. Use an adjustable wrench to loosen the nuts that connect the water supply lines to the sink. Once the nuts are loose, you can disconnect the lines by hand.
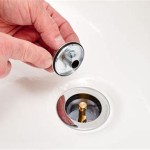
- Disconnect the drain. The drain is usually held in place by a nut that is located underneath the sink. Use an adjustable wrench to loosen the nut and then remove the drain by hand.
- Remove the countertop. The countertop is usually held in place by screws or bolts. Use a screwdriver or wrench to remove the screws or bolts and then lift the countertop off of the cabinet.
- Remove the sink. The sink is usually held in place by a bead of caulk. Use a putty knife to cut through the caulk and then lift the sink out of the cabinet.
- Clean the cabinet. Once the countertop and sink have been removed, take some time to clean the cabinet. This will help to ensure that the new countertop and sink fit properly.
- Install the new countertop. Place the new countertop on the cabinet and make sure that it is level. Use shims to level the countertop if necessary.
- Install the new sink. Place the new sink in the countertop and make sure that it is level. Use caulk to seal the gap between the sink and the countertop.
- Reconnect the water supply lines. Reconnect the water supply lines to the sink and tighten the nuts until they are snug.
- Reconnect the drain. Reconnect the drain to the sink and tighten the nut until it is snug.
- Turn on the water supply and check for leaks. Turn on the water supply to the sink and check for leaks. If you find any leaks, tighten the nuts or bolts until the leak stops.
Tips
* If you are not comfortable removing the bathroom counter and sink yourself, you can hire a plumber to do it for you. * Be sure to measure the space where the new countertop and sink will be installed before you purchase them. * Use a level to make sure that the new countertop and sink are level. * Caulk the gap between the sink and the countertop to prevent water from leaking. * Turn on the water supply and check for leaks before you use the sink.
How To Remove Replace A Vanity Top Easy Bathroom Sink Remodel

Replace Vanity Top And Faucet Diy Network

How To Remove A Countertop From Vanity Decor Adventures

How To Remove A Bathroom Vanity Budget Dumpster

How To Remove A Bathroom Vanity Remodel

How To Remove Bathroom Vanity Cabinet Step By Guide

How To Remove A Countertop From Vanity Decor Adventures

How To Remove Replace A Vanity Top Easy Bathroom Sink Remodel


How To Remove A Countertop From Vanity Decor Adventures
Related Posts