How to Build a Rustic Bathroom Vanity Yourself
A rustic bathroom vanity can add a touch of warmth and charm to your bathroom. It's a great way to add some character to a space that can often feel cold and sterile. Building a rustic bathroom vanity yourself is a relatively easy project that can be completed in a weekend.
Materials you'll need:
- Reclaimed wood
- Vanity top
- Sink
- Faucet
- Drawer slides
- Drawer pulls
- Wood screws
- Wood glue
- Sandpaper
- Polyurethane
Tools you'll need:
- Circular saw
- Miter saw
- Drill
- Screwdriver
- Sander
- Level
- Clamps
Instructions:
- Cut the reclaimed wood to size. The size of the wood will depend on the size of your vanity. You'll need to cut the wood for the frame, the sides, the back, and the drawer fronts.
- Assemble the frame. The frame is the basic structure of the vanity. It will support the vanity top and the sink. To assemble the frame, cut four pieces of wood to the desired length. Cut a 45-degree angle on the ends of each piece of wood and then glue and screw the pieces together.
- Attach the sides to the frame. The sides of the vanity will be attached to the inside of the frame. Cut two pieces of wood to the desired height and width. Attach the sides to the frame using wood screws.
- Attach the back to the vanity. The back of the vanity will be attached to the back of the frame. Cut a piece of wood to the desired size and attach it to the frame using wood screws.
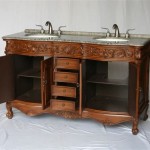
- Install the vanity top. The vanity top will be installed on top of the frame. Place the vanity top on top of the frame and secure it using wood screws.
- Install the sink. The sink will be installed in the vanity top. Cut a hole in the vanity top for the sink and then place the sink in the hole. Secure the sink using silicone sealant.
- Install the faucet. The faucet will be installed on the vanity top. Cut a hole in the vanity top for the faucet and then place the faucet in the hole. Secure the faucet using silicone sealant.
- Install the drawer slides. The drawer slides will be installed on the sides of the vanity. Cut two pieces of wood to the desired length and attach them to the sides of the vanity using wood screws. The drawer slides will then be attached to the pieces of wood.
- Build the drawers. The drawers will be built using reclaimed wood. Cut two pieces of wood to the desired length and width for the sides of the drawers. Cut two pieces of wood to the desired length and width for the front and back of the drawers. Assemble the drawers using wood glue and screws.
- Attach the drawer fronts. The drawer fronts will be attached to the drawers using wood glue and screws.
- Install the drawer pulls. The drawer pulls will be installed on the drawer fronts. Drill a hole in the drawer fronts for the drawer pulls and then insert the drawer pulls.
- Sand and finish the vanity. Sand the vanity to smooth out any rough edges. Apply a polyurethane finish to the vanity to protect it from water damage.
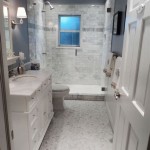
Once you've finished building your rustic bathroom vanity, you can enjoy the satisfaction of having created a beautiful and unique piece of furniture for your home.

Rustic Bathroom Vanity Kreg Tool

Rustic Bathroom Vanity Kreg Tool

Rustic Bathroom Vanity Kreg Tool

Diy Rustic Bathroom Vanity Sammy On State

31 Impressive Diy Rustic Farmhouse Bathroom Vanity Ideas Vanities

Rustic Modern Bathroom Vanity Build Plans Shades Of Blue Interiors

Diy Rustic Bathroom Vanity Hometalk

Diy Bathroom Vanity For 65 Angela Marie Made

Rustic Bathroom Vanities Ana White

Diy Bathroom Vanity For 65 Angela Marie Made
Related Posts