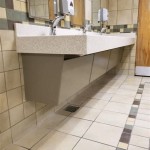
How to Install a Floating Bathroom Cabinet: A Step-by-Step Guide
Installing a floating bathroom cabinet can be a great way to add storage and style to your bathroom. These cabinets hang on the wall without any visible support, giving your bathroom a more modern and spacious look. While these cabinets require more rigorous installation than traditional bathroom cabinets, it is a project that most DIYers can easily tackle within a day.
Materials You'll Need:
- Floating bathroom cabinet
- Level
- Stud finder
- Drill
- Screws
- Anchors (if necessary)
Step-by-Step Instructions:
Step 1: Choose the LocationDecide where you want to install the floating bathroom cabinet. Use a level to ensure that the area is level. Mark the location of the cabinet on the wall with a pencil.
Step 2: Find the StudsUse a stud finder to locate the studs in the wall. Studs are vertical supports that run from the floor to the ceiling. It is essential to mount the cabinet into studs to ensure it is secure.
Step 3: Mark the Screw HolesHold the cabinet against the wall and align it with the marks you made in Step 1. Use a level to ensure that the cabinet is level. Mark the screw holes on the wall through the holes in the back of the cabinet.
Step 4: Drill the Pilot HolesUse a drill to drill pilot holes at each of the marked screw holes. The pilot holes should be slightly smaller than the screws you will be using.
Step 5: Install the Anchors (if necessary)If you are not mounting the cabinet into studs, you will need to use anchors to secure it to the wall. Insert the anchors into the pilot holes and tap them flush with the wall.
Step 6: Mount the CabinetLift the cabinet onto the wall and align the screw holes with the pilot holes. Drive the screws into the pilot holes until the cabinet is secure. Use a level to ensure that the cabinet is still level.
Step 7: Finishing TouchesInstall any doors or drawers on the cabinet. Then, caulk around the edges of the cabinet to seal any gaps and prevent moisture from getting in.
Tips:
- If you are not comfortable drilling into studs, you can use heavy-duty drywall anchors to secure the cabinet to the wall.
- Use a level throughout the installation process to ensure that the cabinet is level.
- If you are installing a large or heavy cabinet, you may need to use additional support brackets.
- Caulk around the edges of the cabinet to seal any gaps and prevent moisture from getting in.

How To Install A Veneto Bath Floating Bathroom Vanity

Install A Floating Vanity

How To Build A Diy Modern Floating Vanity Or Tv Console

Diy Floating Bathroom Vanity Remodelando La Casa

Diy Floating Bathroom Vanity Remodelando La Casa

How To Build A Floating Bathroom Vanity W Led Lights Woodworking

Floating Vanity Layout Tutorial

Diy Bathroom Floating Vanity With Drawers Hydrangea Treehouse

How To Build A Diy Modern Floating Vanity Or Tv Console

How To Install Bathroom Cabinets