How to Remove a Bathroom Tub Faucet
Removing a bathroom tub faucet may seem like a daunting task, but with the right tools and a little know-how, it can be done in a few simple steps. Whether you're replacing an old faucet or installing a new one, following these instructions will ensure the job is done correctly and efficiently.
Tools You'll Need:
- Adjustable wrench or basin wrench
- Slip-joint pliers
- Flathead screwdriver
- Basin wrench socket (optional)
Step 1: Turn Off the Water Supply
Before attempting to remove the faucet, it's crucial to shut off the water supply to prevent flooding. Locate the water shutoff valves under the sink or in a nearby utility closet. Turn the handles clockwise to close the valves.
Step 2: Remove the Aerator
Most faucets have an aerator attached to the spout. Use a wrench or pliers to unscrew the aerator and set it aside.
Step 3: Disconnect the Water Supply Lines
Using an adjustable wrench, loosen and disconnect the water supply lines from the faucet. Be cautious as water may still be trapped in the lines, so have a bucket or towel ready to catch any drips.
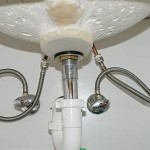
Step 4: Remove the Mounting Nut
Underneath the faucet, you'll find a large mounting nut that secures it to the tub deck. Use a basin wrench or basin wrench socket to loosen and remove this nut.
Step 5: Lift the Faucet
Once the mounting nut is removed, carefully lift the faucet up and off the tub deck. If it's stuck, gently pry it loose with a flathead screwdriver.
Step 6: Remove the O-Rings and Washers
Inspect the old faucet and identify any O-rings or washers that are worn or damaged. These should be replaced before installing the new faucet.
Step 7: Install the New Faucet
Align the new faucet with the tub deck and place the O-rings or washers in their proper positions. Carefully lower the faucet onto the deck and hand-tighten the mounting nut.
Step 8: Reconnect the Water Supply Lines
Hand-tighten the water supply lines into the new faucet. Use an adjustable wrench to further tighten the connections, but avoid overtightening.
Step 9: Reinstall the Aerator
Screw the aerator back onto the faucet spout, tightening it by hand.
Step 10: Turn On the Water Supply
Slowly turn on the water shutoff valves under the sink. Check for any leaks at the faucet or the water supply connections. If there are any leaks, tighten the connections further or replace the O-rings or washers.
Congratulations!
You have successfully removed and replaced your bathroom tub faucet. Enjoy the satisfaction of completing this plumbing task on your own.

How To Fix A Leaking Bathtub Faucet Diy Family Handyman

How To Replace A Mobile Home Bathtub Faucet White Knight

Replacing Shower Tub Faucet How To Install A New

How To Replace A Tub Spout

Learn How To Remove And Install Various Tub Spouts

How To Replace A Tub Spout Project Tutorial Bob Vila

Bath Tub Spout Removal And Installation

Learn How To Remove And Install Various Tub Spouts

How To Replace A Delta Tub Spout Everyday Home Repairs

How To Replace A Bathtub Spout Diy Family Handyman
Related Posts