How To Repair Loose Bathroom Floor Tiles
Having loose bathroom floor tiles is not only unsightly but can also pose safety hazards. If not addressed promptly, it can lead to further damage to the tiles and the underlying subfloor. Fortunately, repairing loose bathroom floor tiles is a relatively straightforward process that can be completed with basic tools and materials. This article will provide a comprehensive guide on the essential aspects of how to repair loose bathroom floor tiles, ensuring a secure and aesthetically pleasing finish.
Identifying the Cause
Before attempting to repair loose bathroom floor tiles, it is essential to identify the underlying cause of the problem. Common causes include improper installation, moisture damage, or structural movement. Once the cause has been determined, the appropriate repair method can be selected.
Preparing the Surface
Before starting the repair process, the loose tiles and the surrounding area must be thoroughly cleaned. Remove any dirt or debris using a vacuum cleaner or damp cloth. If the tiles are cracked or broken, they should be removed and replaced with new ones. The subfloor beneath the loose tiles should also be inspected for any signs of damage or moisture.
Applying Adhesive
Once the surface has been prepared, it is time to apply adhesive to the back of the loose tiles. Use a high-quality tile adhesive specifically designed for bathroom applications. Spread the adhesive evenly over the back of the tile, using a notched trowel to create ridges that will help to bond the tile to the subfloor.
Setting the Tiles
Carefully position the loose tiles onto the prepared area and press them firmly into place. Use a rubber mallet or tapping block to gently tap the tiles until they are level with the surrounding tiles. Once the tiles have been set, allow the adhesive to dry completely according to the manufacturer's instructions.
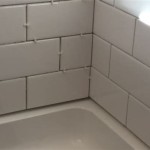
Grouting
Once the adhesive has dried, the joints between the tiles need to be filled with grout. Use a grout float to apply the grout into the joints, pressing firmly to ensure that the grout fills the gaps completely. Remove any excess grout using a damp sponge and allow the grout to dry fully.
Sealing
To protect the tiles and grout from moisture damage, it is important to apply a sealant. Use a brush or sponge to apply the sealant to the tiles and grout, ensuring that all surfaces are covered. Allow the sealant to cure for the recommended amount of time before using the bathroom.
Conclusion
By following the essential aspects outlined in this guide, you can effectively repair loose bathroom floor tiles, ensuring a secure and visually appealing finish. If you encounter any difficulties during the repair process, do not hesitate to consult a professional for assistance.

How To Fix Loose Hollow Tile Floors Don T Remove Or Replace Just Drill Fill
.png?strip=all "How To Fix Loose Or Broken Ceramic Floor Tiles")
How To Fix Loose Or Broken Ceramic Floor Tiles

How To Fix Loose Floor Tiles Alliance Flooring Directory

Fix A Floor Repair Loose Ceramic Tile Diy

Fixing Loose Floor Tiles And Why They In New Builds

Floor Tiles Repairing Tubes Kits Syringes Fix A

Tile Repair Loose Tiles Part 1 How To Identify And The Proper Way Remove Them

How To Fix Loose Floor Tiles Beginner Friendly Guide

Fix A Floor 10 1 Oz Repair Adhesive Fix010 The Home Depot

How To Diy Repair Your Leaking Shower Without Removing Tiles United Trade Links
Related Posts