How to Fix a Bathroom Sink: A Comprehensive Guide
A faulty bathroom sink can be an inconvenience, hindering your daily routine and hygiene practices. Whether it's a leaky faucet, a clogged drain, or a cracked basin, fixing a bathroom sink requires a combination of basic plumbing knowledge and some DIY skills. In this article, we'll delve into the essential aspects of sink repair, providing step-by-step instructions and troubleshooting tips to help you restore your bathroom sink to optimal functionality.
Identifying the Problem
Before attempting repairs, it's crucial to pinpoint the exact issue. A few common problems include:
- Leaky faucet: Faulty seals, worn-out washers, or damaged valves can cause water leaks.
- Clogged drain: Hair, soap scum, and debris can accumulate in the drain, slowing down or preventing water flow.
- Cracked basin: These can occur due to impact or thermal stress and can lead to leaks or instability.
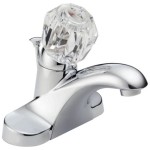
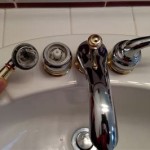
Fixing a Leaky Faucet
Materials:
- Replacement faucet cartridge or washer
- Adjustable wrench
- Screwdriver
Steps:
- Turn off the water supply to the faucet.
- Use a screwdriver to remove the handle and expose the cartridge or washer.
- Extract the old cartridge or washer and replace it with the new one.
- Tighten the cartridge or washer using the adjustable wrench.
- Reattach the handle and turn on the water supply to test the repair.
Clearing a Clogged Drain
Materials:
- Plunger
- Drain snake
- Chemical drain cleaner (use with caution)
Steps:
- Fill the sink with a few inches of water to provide a seal for the plunger.
- Place the plunger over the drain and push and pull vigorously to create pressure and dislodge the clog.
- If plunging doesn't work, insert a drain snake into the drain and rotate it to break up the clog.
- As a last resort, pour chemical drain cleaner into the drain and follow the instructions on the container.
Repairing a Cracked Basin
Materials:
- Epoxy resin
- Mixing cups and stirrers
- Sandpaper
- Cloth
Steps:
- Clean the area around the crack and dry it thoroughly.
- Sand the edges of the crack to create a rough surface for the epoxy to adhere to.
- Mix the epoxy resin according to the manufacturer's instructions.
- Apply the epoxy to the crack and spread it evenly using a cloth.
- Allow the epoxy to cure for the recommended time before using the sink.
Preventive Measures
To minimize the risk of future bathroom sink issues, consider the following preventive measures:
- Avoid using abrasive cleaners: These can damage the finish and weaken the sink.
- Clean the drain regularly: Use a drain cleaner or vinegar to prevent clogs.
- Use tempered water: Avoid using extremely hot or cold water, as it can put stress on the sink.
- Inspect the sink periodically: Look for leaks, cracks, or other signs of damage.
Professional Help
If you encounter complex issues or are unable to fix the problem yourself, don't hesitate to contact a licensed plumber. They have the expertise and equipment to diagnose and repair any bathroom sink problem effectively.
By following these steps and tips, you can restore your bathroom sink to optimal functionality, ensuring a clean and convenient bathroom experience.

5 Natural Ways To Unclog A Bathroom Sink Hiller How

Plumbing Repairs How To Repair Fix It Diy Installation

How To Fix Or Maintain Your Sink S Pop Up Mechanism

How To Fit A Bathroom Sink Diy Guides Victorian Plumbing

How To Remove And Replace A Bathroom Sink Diy

How To Fix A Bathroom Sink Drain Stopper 4 Easy Solutions

How To Unclog A Bathroom Sink Hana S Happy Home

How To Fix A Bathroom Sink That Won T Drain Bfp Bay Area

Do You Have A Leaking Bathroom Sink Learn About The Possible Causes Water Line Repair In Lake Worth Tx Benjamin Franklin Plumbing

How To Replace A Sink Stopper Quick And Simple Home Repair