How to Change a Bathroom Sink Aerator
Before diving into the specifics, it's worth noting the essential role of a bathroom sink aerator. Its primary function is to regulate water flow while simultaneously introducing air, resulting in a steady stream without splashing. Over time, however, mineral deposits can accumulate within the aerator, leading to reduced water pressure and flow inconsistencies. Fortunately, changing a bathroom sink aerator is a straightforward task that can be accomplished in a few simple steps.
Essential Aspects for Effective Aerator Replacement
To ensure a successful aerator replacement, several key aspects must be considered:
- Identifying the correct aerator: Various aerators are available in the market, differing in size and design. Matching the new aerator to the existing one is crucial to ensure compatibility with your sink.
- Selecting a high-quality replacement: Opt for aerators made from durable materials like brass or stainless steel to guarantee longevity and resistance to corrosion.
- Gathering necessary tools: A pair of pliers or an aerator wrench is typically sufficient for the job, although some aerators may require a wrench or screwdriver.
- Understanding the replacement process: Familiarizing yourself with the steps involved in changing the aerator will help you approach the task confidently.
Step-by-Step Aerator Replacement Guide
With the essential aspects in mind, let's proceed with a step-by-step guide for changing a bathroom sink aerator:
- Turn off the water supply: Locate the shut-off valves under the sink and close them to prevent water flow during the replacement.
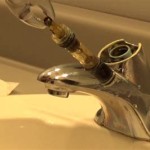
- Remove the old aerator: Using pliers or an aerator wrench, carefully unscrew the old aerator from the faucet. Avoid excessive force to prevent damage to the faucet or aerator.
- Clean the faucet threads: Inspect the threads on the faucet where the aerator attaches and clean any debris or mineral deposits to ensure a proper seal.
- Wrap the new aerator with plumber's tape: Applying a few wraps of plumber's tape around the threads of the new aerator creates a watertight seal.
- Screw on the new aerator: Hand-tighten the new aerator onto the faucet, ensuring it is securely attached but avoiding overtightening.
- Turn on the water supply: Open the shut-off valves to restore water flow and check for any leaks around the aerator.
Changing a bathroom sink aerator is a simple and effective way to restore optimal water flow and prevent splashing. By following these essential aspects and step-by-step instructions, you can effortlessly maintain a functional and efficient bathroom sink.

How To Remove The Faucet Aerator Ozone Microbubble Clean Systems For Bathroom Kitchen Manufacturer Strongco

Fixing A Faucet Aerator You Can Be Diy R Too The Kim Six Fix

How To Replace A Faucet Aerator Repair And

How To Replace A Sink Aerator

How To Install A Faucet Aerator Dte Energy

Fixing A Faucet Aerator You Can Be Diy R Too The Kim Six Fix

How To Remove A Faucet Aerator Without Key Or Wrench

Replacing A Faucet Aerator

How To Install A Water Saving Aerator In Your Moen Bathroom Faucet

How To Reassemble Your Faucet S Aerator The Lone Sysadmin
Related Posts


