Installing a Bathroom Fan Roof Vent: Essential Aspects
A bathroom fan roof vent is an essential component for maintaining proper ventilation in your bathroom, helping to remove moisture, odors, and pollutants. Installing a bathroom fan roof vent can be a straightforward project if done correctly. Here are some key aspects to consider:
1. Planning and Preparation
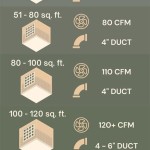
Before starting, plan the location of the fan vent on the roof. Choose a spot that provides a clear path for the vent pipe to connect to the fan. Mark the location and drill a pilot hole for the vent pipe. Gather necessary materials, including the fan vent, vent pipe, flashing, and sealant.
2. Cutting the Roof Vent Hole
Using a reciprocating saw or jigsaw, cut a hole in the roof according to the manufacturer's instructions. Make sure the hole is the correct size to accommodate the fan vent and flashing. Remove any insulation or roofing material around the hole.
3. Installing the Flashing
Apply a layer of roofing cement around the perimeter of the hole. Place the flashing over the hole and secure it with roofing nails or screws. Fold the edges of the flashing up around the vent pipe and seal any gaps with roofing cement.
4. Installing the Vent Pipe
Insert the vent pipe into the hole and secure it to the flashing with screws or nails. Seal all joints between the vent pipe and flashing using roofing cement. Extend the vent pipe above the roof to the required height, ensuring adequate clearance for proper ventilation.
5. Installing the Fan Vent
Place the fan vent on top of the vent pipe and secure it with screws or bolts. Connect the vent to the fan inside the bathroom according to the manufacturer's instructions. Seal any gaps between the vent and the vent pipe using roofing cement.
6. Finishing Touches
Cover the roof vent with a vent cap to prevent water from entering. Apply a bead of sealant around the vent cap to ensure a watertight seal. Inspect the entire installation for any loose connections or gaps and seal them as necessary.
Tips for Success
- Wear appropriate safety gear when cutting and working on the roof.
- Use high-quality materials designed for roofing applications.
- Follow the manufacturer's instructions carefully.
- Seal all joints and connections thoroughly to prevent leaks.
- Consider hiring a professional if you are uncomfortable working on your roof.

Installing A Bathroom Fan Fine Homebuilding

How To Install A Bathroom Exhaust Fan Lowe S

How To Install A Bathroom Fan Roof Vent 7 Step Guide Home Inspector Secrets

How To Replace And Install A Bathroom Exhaust Fan From Start Finish For Beginners Easy Diy

Venting A Bath Fan In Cold Climate Fine Homebuilding

Blog

Where Do Bathroom Vents Go Lopco Contracting Ri

How To Use An In Line Exhaust Fan Vent Two Bathrooms Diy Family Handyman

I Am Stuck On A Bathroom Exhaust Vent Installation Doityourself Com Community Forums

Roof Flashing For Bathroom Fans
Related Posts