How to Replace a Dripping Bathroom Faucet
A dripping faucet is more than just an annoyance—it can also waste a significant amount of water. If you're looking to save money and water, replacing a dripping faucet is a simple and inexpensive project that you can do yourself.
Tools and Materials You'll Need
- Basin wrench
- Adjustable wrench
- Phillips head screwdriver
- Flat head screwdriver
- New faucet
- Teflon tape
- Plumber's putty
Step-by-Step Instructions
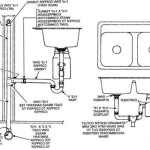
1. Turn off the water supply. There will be two valves under the sink that control the hot and cold water. Turn both valves clockwise to shut off the water.
2. Remove the old faucet. Using a basin wrench, loosen the nuts that hold the faucet in place. Be careful not to overtighten the nuts, as you could damage the faucet or the sink.
3. Disconnect the water lines. Using an adjustable wrench, disconnect the hot and cold water lines from the faucet.
4. Remove the old cartridge. Most faucets have a cartridge that controls the flow of water. To remove the cartridge, first remove the handle by prying it off with a flat head screwdriver. Then, unscrew the cartridge with a Phillips head screwdriver.
5. Install the new cartridge. Apply a small amount of Teflon tape to the threads of the new cartridge. Then, screw the cartridge into the faucet by hand until it is snug. Tighten the cartridge with a Phillips head screwdriver.
6. Reconnect the water lines. Connect the hot and cold water lines to the faucet. Tighten the nuts with an adjustable wrench.
7. Install the new faucet. Place the new faucet into the sink and secure it with the nuts. Tighten the nuts with a basin wrench.
8. Turn on the water supply. Slowly turn on the valves under the sink to turn on the water supply. Check for any leaks.
9. Finish the installation. Apply a bead of plumber's putty around the base of the faucet to seal any gaps. Then, put the handle back on the faucet.
Tips for Avoiding Leaks
- Be sure to apply Teflon tape to the threads of all fittings.
- Tighten all nuts and fittings securely, but be careful not to overtighten.
- Use plumber's putty to seal any gaps around the base of the faucet.

How To Fix A Bathroom Faucet 14 Steps

How To Fix A Bathroom Faucet 14 Steps

How To Fix A Leaking Bathtub Faucet Diy Family Handyman

Diy How To Replace And Install A Bathroom Sink Faucet

How To Fix A Leaky Faucet True Value

How To Fix A Dripping Moen Faucet Howtolou Com

Simple Ways To Fix A Leaky Delta Bathroom Sink Faucet

How To Fix A Leaking Bathroom Faucet Quit That Drip

How To Fix A Leaky Single Handle Sink Faucet

5 Reasons Your Faucet Is Dripping Water How To Fix It
Related Posts