Can I Replace Bathroom Extractor Fan Myself?
A bathroom extractor fan is an essential appliance that helps to remove moisture and odours from the room. If your extractor fan is not working properly, it can lead to a build-up of condensation, which can cause damage to your bathroom and encourage the growth of mould and mildew. Replacing a bathroom extractor fan is a relatively simple task that can be completed in a few hours. Here is a step-by-step guide to help you get the job done:
Step 1: Gather Your Tools and Materials
You will need the following tools and materials to replace your bathroom extractor fan:
- New bathroom extractor fan
- Screwdriver
- Electrical tape
- Wire strippers
- Caulk gun
- Caulk
Step 2: Turn Off the Power
Before you begin working on the extractor fan, it is important to turn off the power at the circuit breaker. This will prevent you from getting shocked.
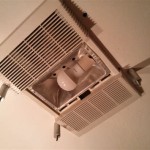
Step 3: Remove the Old Extractor Fan
Once the power is off, you can remove the old extractor fan. To do this, simply unscrew the screws that are holding it in place. Once the screws are removed, you can gently pull the fan out of the wall.
Step 4: Disconnect the Wires
Once the fan is removed, you will need to disconnect the wires that are connected to it. To do this, simply use a screwdriver to loosen the screws that are holding the wires in place. Once the screws are loose, you can pull the wires off of the terminals.
Step 5: Install the New Extractor Fan
Now you can install the new extractor fan. To do this, simply insert the fan into the hole in the wall and screw it into place. Once the fan is in place, you can connect the wires to the terminals. Make sure to tighten the screws securely.
Step 6: Seal the Fan
Once the fan is installed, you need to seal it around the edges to prevent air leaks. To do this, simply apply a bead of caulk around the perimeter of the fan. Once the caulk is dry, your new extractor fan will be ready to use.
Step 7: Turn on the Power
Once the caulk is dry, you can turn on the power at the circuit breaker. Your new extractor fan should now be working properly.
Tips
Here are a few tips to help you replace your bathroom extractor fan:
- Make sure that the new extractor fan is the same size as the old fan. If it is not, you may need to make some modifications to the hole in the wall.
- When you are connecting the wires, make sure that the positive wire is connected to the positive terminal and the negative wire is connected to the negative terminal.
- If you are not comfortable working with electricity, it is best to hire a qualified electrician to replace your extractor fan.

Do You Need A Hole In The Wall For An Extractor Fan I Blogs It

Tips For Installing Or Replacing A Bathroom Fan Forbes Home

Bathroom Extractor Fan Installation Cost Guide How Much Is It

Bathroom Extractor Fan Installation Cost Guide How Much Is It

Replace Bathroom Extractor Fan

When Should Bathroom Extractor Fans Be Replaced Envirovent

How To Replace A Bathroom Fan With Pictures Wikihow

Bathroom Extractor Fan Installation Cost Guide How Much Is It

Extractor Fan Installation Bathrooms Kitchens Pimlico

How To Replace A Bathroom Fan With Pictures Wikihow
Related Posts