How to Replace a Bathroom Exhaust Fan with Light and Heater
A bathroom exhaust fan with light and heater is an essential part of any bathroom, providing ventilation, illumination, and warmth. If your current fan is malfunctioning or outdated, replacing it is a relatively simple project that you can tackle yourself with the right tools and materials. Here's a step-by-step guide to help you through the process:
Safety First
Before starting any electrical work, it's crucial to turn off the power to the bathroom at the circuit breaker panel. This will prevent any electrical shocks or accidents.
Gather Your Tools and Materials
To replace the exhaust fan, you'll need the following tools and materials:
- New bathroom exhaust fan with light and heater
- Screwdriver (Phillips and flathead)
- Wire cutters and strippers
- Electrical tape
- Caulk gun and caulk
- Safety glasses
- Step ladder or stool
Remove the Old Fan
Once the power is off, follow these steps to remove the old fan:
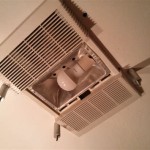
- Remove the grille cover by gently prying it off with a flathead screwdriver.
- Disconnect the electrical wires from the fan motor. Use wire strippers to remove about 1/2 inch of insulation from the ends of the wires.
- Unscrew the mounting screws that hold the fan in place.
- Carefully pull the fan out of the housing.
Prepare the New Fan for Installation
Before installing the new fan, make sure to:
- Measure the opening in the ceiling to ensure the new fan will fit.
- Connect the electrical wires to the corresponding terminals on the new fan. Use electrical tape to secure the connections.
- Install the mounting brackets on the housing, if necessary.
- Place the new fan into the housing and secure it with the mounting screws.
- Slide the grille cover back into place.
- Turn the power back on at the circuit breaker panel.
- Test the fan to ensure it's working properly.
- Choose a fan that is rated for the size of your bathroom.
- Make sure the new fan has the features you want, such as a light and heater.
- Turn off the power before starting any electrical work.
- Wear safety glasses when working with tools.
- If you're not comfortable working with electrical wiring, consult a qualified electrician.
Install the New Fan
To install the new fan, follow these steps:
Apply Caulk and Finish Up
To seal any gaps around the fan housing, apply a bead of caulk. Smooth out the caulk with your finger or a small tool. Once the caulk is dry, your new bathroom exhaust fan with light and heater is ready to use.
Tips for Success

How To Add Exhaust Fan Heater Light Fixture Combination

Install A New Bathroom Vent Fan Light The San Fernando Valley Sun

How To Replace Broan 765h80lb Heater And Fan Assembly

Should I Install A Bathroom Heater Fan Light Combo

How To Take Apart And Clean A Bathroom Exhaust Fan With Heater

Electricians A Bathroom Exhaust Fan Is On 3 Way Switch The Other In Gang Box Elsewhere I Want To Replace With Timer What Are

Installed A New Heating Light Exhaust Fan In Bathroom

Bath Fan Heater Light Replacement Handyman Pro Services

Panasonic Fv 11vh2 Whisperwarm Fan Heater Combination Ventilation Extremely Quiet Long Lasting Easy To Install Code Compliant Energy Star Certified W Bathroom Exhaust

Nutone S 605 605n 665n 668n Replacement Fan Motor 85598000 Instructions
Related Posts