How To Change Bathroom Faucets And Handles
Bathroom faucets and handles are essential components that contribute significantly to the functionality and aesthetic appeal of any bathroom. Understanding the intricacies of changing these fixtures can empower homeowners to tackle plumbing projects independently, saving both time and money. This article delves into the fundamental aspects of changing bathroom faucets and handles, providing a comprehensive guide for DIY enthusiasts.
Tools and Materials:
- Adjustable wrench
- Phillips and flathead screwdrivers
- Basin wrench
- Faucet cartridge or handle replacement parts
- Plumber's putty
- Towels or rags
Step-by-Step Guide:
1. Shut Off Water Supply:
Locate the water supply valves beneath the sink and turn them clockwise until the water flow stops. This prevents any water from escaping during the repair process.
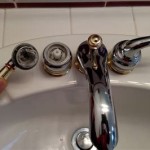
2. Remove Old Faucet or Handles:
Using an adjustable wrench, loosen the nuts securing the faucet or handles to the sink base. Carefully remove the old faucet or handles and set them aside.
3. Clean Faucet Seat:
Clean the faucet seat where the new faucet or handle will be installed. Remove any old sealant or debris using a rag or brush.
4. Install New Cartridge or Handles:
Insert the new faucet cartridge or handles into the faucet seat. Hand-tighten as much as possible, then use an adjustable wrench to gently tighten further. Avoid overtightening.
5. Apply Plumber's Putty:
Roll out a small piece of plumber's putty and shape it into a ring. Place the putty around the base of the faucet or handles to create a watertight seal.
6. Reattach Nut:
Reinstall the nut onto the faucet or handles and tighten securely using an adjustable wrench. Ensure the nut is tight enough to prevent leaks but not so tight as to damage the fixtures.
7. Turn On Water Supply:
Slowly open the water supply valves and check for any leaks. If there are leaks, tighten the nuts further or adjust the plumber's putty as needed.
Conclusion:
Changing bathroom faucets and handles can be a straightforward task with the right tools, materials, and knowledge. By following these steps carefully, homeowners can save money, gain a sense of accomplishment, and ensure their bathrooms remain functional and stylish.

How Do I Replace Bathroom Sink Faucet Handles Cleaning More

Diy How To Replace A Bathroom Sink Faucet Remove Install

How To Remove And Install A Bathroom Faucet

How To Remove Moen Bathroom Faucet Handle In 2 Steps

Replacing A Bathroom Faucet Fine Homebuilding

How To Tighten Faucet Handle Homeserve Usa

Tips Tricks Remove Delta 2 Handle 4 In Bathroom Sink Faucet With Bar 5 21 18

How To Install Replace A Bathroom Faucet

How To Replace A Bathroom Faucet Home Repair Tutor

How To Replace A Bathroom Faucet Removal And Installation
Related Posts