How To Remove Bathroom Exhaust Cover
Maintain a clean and well-ventilated bathroom by learning the essential aspects of removing your bathroom exhaust cover. Understanding the components, safety precautions, tools required, and step-by-step instructions will ensure a smooth and effective process, preventing any potential damage or accidents.
Importance of Understanding
A bathroom exhaust cover plays a critical role in preventing moisture build-up, eliminating odors, and regulating airflow. Keeping it clean and unobstructed is essential for optimal performance and a healthy bathroom environment. Removing the cover for cleaning or repairs requires careful consideration of various factors.
Cover Components
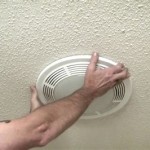
Bathroom exhaust covers typically consist of a grille, housing unit, and fan motor. The grille, visible from the ceiling, conceals the housing unit containing the fan and electrical components. Understanding these components will aid in safe and proper removal.
Safety Precautions
Before attempting to remove the exhaust cover, ensure the power is turned off at the circuit breaker. This crucial step prevents electrical shocks and accidents. Additionally, wear safety glasses and gloves to protect against debris or sharp edges.
Tools Required
The tools necessary for removing a bathroom exhaust cover include a screwdriver (Phillips or flathead), pliers, and a ladder or step stool. Having the right tools on hand will facilitate the process and prevent damage to the cover or surrounding areas.
Step-by-Step Instructions
1. Turn Off Power: Ensure the power is turned off at the circuit breaker or fuse box before proceeding. 2. Remove Grille: Using a screwdriver, gently pry off the grille from the housing unit. 3. Disconnect Electrical Wires: Carefully disconnect the electrical wires connecting the fan motor to the housing unit. Use pliers if necessary. 4. Unscrew Mounting Screws: Locate and remove the screws securing the housing unit to the ceiling. 5. Lower Housing Unit: Carefully lower the housing unit from the ceiling, being mindful of any wires or attachments. 6. Clean or Repair: Once the housing unit is removed, you can clean or repair the fan motor or other components as needed.
Conclusion
By adhering to these essential aspects, you can safely and effectively remove your bathroom exhaust cover for cleaning or repairs. Remember to prioritize safety, use the appropriate tools, and follow the step-by-step instructions to ensure a successful and hassle-free process.

Remove Install A Bathroom Fan Grille In 1 Min

How To Remove Nutone Bathroom Fan Light Cover 2024 Guide Home Inspector Secrets

Bathroom Vent Fan Remove Cover And Clean Dust

Not Sure How To Remove Old Bathroom Fan Install New One Doityourself Com Community Forums

How To Replace Bathroom Exhaust Fan Cover

How To Replace A Bathroom Exhaust Fan Without Attic Access 12 Step Guide Home Inspector Secrets

How To Remove The Light Cover On A Bathroom Exhaust Fan

How To Remove Nutone Bathroom Fan Light Cover 2024 Guide Home Inspector Secrets

How To Replace Bathroom Exhaust Fan Cover

Replace A Bathroom Fan Broan
Related Posts