Kohler Single Hole Bathroom Faucet Installation: Essential Aspects
Kohler single hole bathroom faucet installation involves crucial steps that ensure a seamless and functional setup. Understanding the essential aspects of this process is paramount for ensuring a successful installation. ### Tools and Materials Before commencing the installation, gather the necessary tools and materials: - Adjustable wrench or pliers - Plumber's putty or silicone sealant - Teflon tape or thread sealant - Measuring tape or ruler - Safety glasses ### Preparation 1.Turn off the Water Supply:
Close the main water supply valve to the bathroom, usually located under the sink or behind the toilet. 2.Remove Existing Faucet:
If replacing an old faucet, disconnect the water supply lines and remove the old faucet. Use a wrench or pliers to loosen the nuts holding it in place. 3.Inspect the Installation Area:
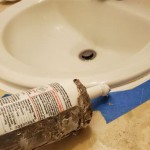
Ensure the sink hole is clean and free of debris. If necessary, use a drill bit to enlarge the hole slightly to accommodate the faucet base. ### Installation 1.Apply Putty or Sealant:
Spread plumber's putty or silicone sealant around the base of the faucet. This will create a seal between the faucet and the sink. 2.Install the Gaskets and Washer:
Insert the mounting gasket and washer onto the threaded shank of the faucet. 3.Thread the Faucet into the Hole:
Carefully thread the faucet into the sink hole. Tighten it by hand as much as possible. 4.Use a Wrench or Pliers:
Once hand-tight, use an adjustable wrench or pliers to fully tighten the faucet, ensuring it is secure and level. 5.Connect the Water Supply Lines:
Attach the hot and cold water supply lines to the corresponding valves on the faucet. Use Teflon tape or thread sealant on the connections. 6.Tighten the Supply Lines:
Secure the supply lines by tightening the nuts using a wrench or pliers. ### Finishing Touches 1.Close the Drain:
Install the pop-up drain assembly or stopper according to the manufacturer's instructions. 2.Turn on the Water Supply:
Slowly turn on the water supply valve and check for any leaks. Tighten any loose connections if necessary. 3.Test the Faucet:
Operate the faucet to ensure it functions properly and delivers water at the desired temperature and pressure. ### Conclusion By following these essential aspects, you can successfully install a Kohler single hole bathroom faucet. This guide provides a comprehensive overview of the process, from preparation to finishing touches. Proper installation ensures a secure and functional faucet that will enhance your bathroom experience for years to come.
Kohler Mistos Battery Powered Touchless Single Hole Bathroom Faucet In Matte Black K R32930 4d Bl The Home Depot

Kohler Rubicon Single Hole Handle Bathroom Faucet In Polished Chrome K R76214 4d Cp The Home Depot

K 10215 4 Forté Single Control Bathroom Sink Faucet Kohler

K R78037 4d Katun Single Handle Bathroom Sink Faucet Kohler

Kohler Rubicon Battery Powered Touchless Single Hole Bathroom Faucet In Vibrant Brushed Nickel K R32928 4d Bn The Home Depot

Ashan Single Handle Bathroom Sink Faucet K R27136 4d Kohler

Kohler Sundae Single Handle Hole Bathroom Faucet In Vibrant Brushed Nickel K R28795 4d Bn The Home Depot

Kohler Numista Single Handle Hole Bathroom Faucet In Vibrant Brushed Nickel K R26583 4d Bn The Home Depot

Kohler Ealing Vibrant Brushed Nickel Single Hole 4 In Centerset 1 Handle Watersense Bathroom Sink Faucet With Drain And Deck Plate The Faucets Department At Com

K 97060 4 Hint Single Handle Bathroom Sink Faucet Kohler