How to Reattach a Drain Plug in a Bathroom Sink
A bathroom sink's drain plug is a crucial component, allowing you to control water flow and make cleaning tasks more manageable. However, these plugs can become loose or detach, leading to frustration when trying to fill the sink. Fortunately, reattaching a drain plug is a relatively simple task that you can often handle yourself with basic tools. This article will guide you through the process, offering clear instructions and useful tips to ensure a successful repair.
Understanding the Drain Plug Mechanism
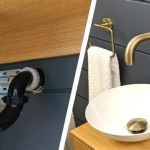
Before attempting to reattach the drain plug, it's essential to understand how it works. Most bathroom sink drain plugs use a simple "lift and turn" mechanism. The plug itself consists of a flat, circular disc with a central hole. Beneath the sink, a threaded rod connects to the plug, allowing it to be lifted and turned. This rod is attached to a small lever, which is either directly accessible or connected to a chain that pulls the plug up.
Tools Required for Reattachment
To reattach a bathroom sink drain plug, you'll need a few basic tools. These include:
- A wrench or pliers: To tighten or loosen the threaded rod.
- A small screwdriver: For adjusting or tightening access screws, if any.
- A flashlight: For improved visibility under the sink.
- Optional: A pair of needle-nose pliers to help grasp the plug or chain.
Steps for Reattaching the Drain Plug
Here's a step-by-step guide to reattaching a bathroom sink drain plug:
- Locate the threaded rod: Underneath the sink, look for a threaded rod connected to the drain plug. It might be metal or plastic, and it could be hidden beneath a metal or plastic cover. Sometimes the rod is covered by a thin access plate, removed with a screwdriver.
- Remove the plug from the drain: If the plug is still in the drain, remove it. Simply lift it from the drain opening, as it will likely have a small lifting tab or groove on the top.
- Adjust the threaded rod: Using a wrench or pliers, turn the threaded rod to adjust the plug's position. Depending on the type of plug, turning the rod clockwise will lower the plug, while turning it counterclockwise will raise it.
- Secure the rod with a nut: Most plugs have a nut that secures the rod to the drain assembly after adjustment. Ensure the nut is properly tightened to prevent the rod from loosening and the plug from detaching.
- Test the drain plug: Once the rod is secured, carefully test the plug by opening and closing the drain. This ensures it's working smoothly and sealing properly.
- Check for leaks: After testing the plug, carefully check for any leaks around the drain opening. If you find any, tighten the rod or the nut further to ensure a leak-free seal.
- Reinstall the access cover if necessary: If you removed an access cover, carefully reinstall it and secure it with the appropriate screws.
Troubleshooting Common Problems
While reattaching a drain plug is typically a straightforward process, you might encounter some challenges. Here are some common problems and their solutions:
- Stripped threads: If the threaded rod is stripped, you may need to replace it with a new one.
- Broken lever or chain: If the lever or chain connecting to the rod is broken, you'll need to replace it.
- Worn out or missing washers: If the washers that seal the drain are worn or missing, replacing them can solve leak problems.
- Bent or broken plug: If the plug itself is bent or broken, it will need to be replaced.
If you encounter any of these issues, it's best to consult a professional plumber for assistance. They can provide expert advice and ensure the proper repair is done safely and efficiently.
Maintaining the Bathroom Sink Drain Plug
Regular maintenance can help prevent future problems with your bathroom sink drain plug. Here are some tips:
- Avoid over-tightening: Over-tightening the rod can damage the threads. Use just enough force to ensure a secure fit.
- Clean the drain regularly: Remove hair and debris that can accumulate in the drain and impede the smooth operation of the plug.
- Lubricate the plug: Applying a small amount of lubricant to the rod and plug can help prevent rust and ensure smooth operation.

How To Replace A Sink Stopper Quick And Simple Home Repair

Bathroom Sink Drain Stopper Not Working

Complete Guide Fixing A Sink Stopper Step By Instructions

How To Fix Drain Plug That Won T Open Empty A Basin Of Water

How To Reattach A Sink Drain Stopper

How To Remove A Sink Stopper The Home Depot

How To Replace A Sink Stopper Quick And Simple Home Repair

Bathroom Sink Drain Stopper Not Working

How To Remove A Sink Stopper Quick Easy Guide

How To Remove A Sink Stopper The Home Depot
Related Posts