How To Clean Out a Bathroom Vent Pipe
Bathroom vent pipes, also known as exhaust fans, are crucial for removing moisture and odors from the bathroom. Over time, these pipes can accumulate dust, lint, grease, and even mold, hindering their effectiveness and potentially causing health problems. Cleaning out a bathroom vent pipe is a relatively straightforward task that can be done with minimal tools and effort. This article will guide you through the process step by step, ensuring a clean and functional vent pipe.
Gather the Necessary Tools and Materials
Before starting the cleaning process, ensure you have the following tools and materials readily available:
- A stepladder or sturdy stool
- A flashlight
- A vacuum cleaner with a crevice tool or a shop vac
- A long, thin brush or a wire coat hanger
- A pair of gloves
- A trash bag
- Distilled white vinegar
- Baking soda
- A spray bottle
- A screwdriver
- A wire brush (optional)
Having all the necessary tools and materials readily available will ensure a smooth and efficient cleaning process.
Step-by-Step Cleaning Process
Cleaning out a bathroom vent pipe is a straightforward process that can be completed in a few simple steps:
- Turn Off the Power: Before accessing the vent pipe, locate the circuit breaker controlling the bathroom exhaust fan and turn it off. This ensures your safety and prevents electrical hazards during the cleaning process.
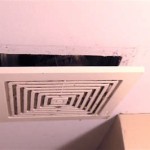
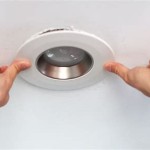
- Remove the Vent Cover: Using a screwdriver, carefully remove the vent cover from the wall. In some cases, the cover might simply snap off or be held in place by clips. Once removed, inspect the cover for any signs of damage or debris buildup, cleaning it as needed.
- Clean the Vent Pipe: Using the vacuum cleaner with a crevice tool or shop vac, thoroughly clean the vent pipe. Insert the vacuum attachment into the pipe and suck out any loose debris, dust, or lint. For stubborn buildup, consider using a long, thin brush or a wire coat hanger wrapped with a cloth to dislodge and remove it.
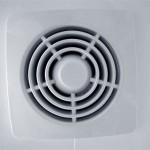
- Clean the Grille: Remove the grille from the vent pipe and wash it thoroughly with warm, soapy water. Rinse the grille thoroughly and allow it to air dry completely before reinstallation.
- Deodorize and Disinfect: To remove odors and disinfect the vent pipe, mix a solution of equal parts distilled white vinegar and water in a spray bottle. Spray the solution into the vent pipe, allowing it to sit for a few minutes before rinsing it thoroughly. You can also sprinkle baking soda into the pipe for further odor removal, followed by a thorough vacuuming.
- Inspection and Maintenance: After cleaning, inspect the vent pipe for any signs of damage, such as cracks or gaps. If any damage is found, it’s crucial to repair it promptly to prevent further deterioration and maintain the system’s effectiveness. Regularly cleaning the vent pipe every 3 to 6 months will ensure optimal airflow and prevent the accumulation of dirt and other debris.
Following these steps will ensure a clean and functional bathroom vent pipe, promoting a healthy and comfortable bathroom environment.
Additional Tips and Considerations
While the above steps provide a comprehensive guide, here are additional tips and considerations to enhance the cleaning process:
- Wear Gloves: It is recommended to wear gloves when handling the vent pipe and components, particularly if there is mold or other contaminants present.
- Use a Wire Brush: For stubborn buildup, consider using a wire brush to scrub the inside of the vent pipe thoroughly. Be cautious not to damage the pipe's interior while using the brush.
- Check for Blockages: During the cleaning process, pay close attention to any signs of blockages in the vent pipe. If a blockage is identified, it should be addressed promptly using an appropriate method, such as a plumbing snake.
- Professional Cleaning: If the vent pipe is heavily clogged or inaccessible, consider seeking professional help. A professional cleaning service will have the expertise and tools to thoroughly clean and maintain the pipe.
By following these tips and considerations, you can effectively clean out your bathroom vent pipe and enhance the performance and longevity of the system.

How To Unclog A Vent Pipe Super Brothers Plumbing Heating Air

How To Unclog A Vent Pipe

How To Clean Bathroom Exhaust Fan Duct Ace Sydney Electricians

How To Clear A Clog On Your Plumbing Vent 3 Step Guide

How To Unclog A Vent Pipe Super Brothers Plumbing Heating Air

8 Simple Steps To Unclog A Vent Pipe

How To Clear A Clogged Plumbing Vent Eyman Heating Air

Using A Borescope To Clean Out Clogged Vent Pipe

Plumbing Vents Common Problems And Solutions Family Handyman

Plumbing Vents 101 What You Need To Know Innovative Pros Llc
Related Posts