How to Fix a Bathroom Tap
Maintaining plumbing is essential for the smooth functioning of your bathroom. Leaky taps can not only be annoying, but they can also waste water and increase your utility bills. Understanding how to fix a bathroom tap is a practical skill that can save you time, money, and hassle. This article will guide you through the essential steps to fix a leaky bathroom tap.
Identifying the Type of Tap
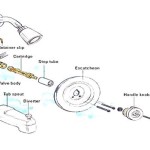
The first step is to identify the type of tap you have. The most common types are compression taps, cartridge taps, and disk taps. Compression taps have a washer that seals against the valve seat when the tap is closed. Cartridge taps have a replaceable cartridge that contains both the washer and the valve seat. Disk taps use two ceramic disks that slide against each other to control the flow of water.
Tools and Materials
Depending on the type of tap, you will need some basic tools and materials to fix the leak. These include:
- Adjustable wrench
- Screwdriver
- Replacement washer (for compression taps)
- Replacement cartridge (for cartridge taps)
- Spanner or socket wrench (for disk taps)
- Teflon tape
- Plumber's putty
Replacing a Washer (Compression Taps)
1. Turn off the water supply to the tap. 2. Open the tap to release any remaining water. 3. Remove the aerator (if present). 4. Use an adjustable wrench to loosen the packing nut. 5. Remove the old washer and replace it with a new one. 6. Reassemble the tap and tighten the packing nut.
Replacing a Cartridge (Cartridge Taps)
1. Turn off the water supply to the tap. 2. Open the tap to release any remaining water. 3. Remove the handle. 4. Use a screwdriver to remove the cartridge retaining nut. 5. Pull out the old cartridge and insert a new one. 6. Reassemble the tap and tighten the cartridge retaining nut.
Fixing a Disk Tap
1. Turn off the water supply to the tap. 2. Open the tap to release any remaining water. 3. Remove the handle. 4. Use a spanner or socket wrench to remove the disk assembly. 5. Inspect the disks for damage or wear. 6. Replace the disks if necessary. 7. Reassemble the tap and tighten the disk assembly.
Conclusion
Fixing a bathroom tap is a straightforward task that can be done with basic tools and materials. By following the steps outlined in this article, you can identify the type of tap you have, gather the necessary tools, and fix the leak efficiently. If the problem persists or you are unsure about any steps, it is recommended to consult a qualified plumber.

How To Easily Replace Basin Taps Step By

Bath Shower Mixer Diverter Maintenance And Replacement

Bath Shower Mixer Ceramic Disc Flow Valve Maintenance And Replacement

How To Replace Bathroom Taps Big

How To Fix A Leaky Faucet True Value

How To Change Bathroom Taps Everything You Need Know

How To Fix A Dripping Tap

Single Lever Mono Basin Flow Cartridge Maintenance And Replacement

How To Install Basin Taps Replacing A Bathroom Sink Tap

Diy Guide To Fixing Your Leaking Taps Better Homes And Gardens
Related Posts