How to Replace a Bathroom Vanity Cabinet in a Step-by-Step Guide
A new bathroom vanity cabinet can give your bathroom a fresh, updated look. However, replacing a vanity can be a daunting task, especially if you've never done it before. But don't worry, with the right tools and materials, you can tackle this project like a pro.
Before you start, ensure you have all the necessary tools and materials. You will need a new vanity cabinet, essential tools like a screwdriver, wrench, caulk gun, and level, and plumbing supplies like a drain stopper and supply lines.
Step 1: Prepare the Bathroom
Start by removing everything from the vanity cabinet and drawers. Then, turn off the water supply to the sink and disconnect the drain and supply lines. Once the plumbing is disconnected, remove the vanity from the wall. If the vanity is attached to the floor, you may need to remove the screws or bolts holding it in place.
Step 2: Install the New Vanity Cabinet
Once the old vanity is removed, you can start installing the new one. Place the new vanity in the space where the old one was and level it using a level. Once the vanity is level, secure it to the wall or floor using screws or bolts.
Step 3: Connect the Plumbing
Once the vanity is installed, reconnect the drain and supply lines. First, attach the drain stopper to the drainpipe, then connect the supply lines to the water valves under the sink. Tighten all connections securely.
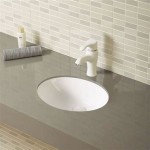
Step 4: Install the Sink
Next, it's time to install the sink. Place the sink on top of the vanity and center it. Once the sink is centered, apply a bead of caulk around the edge of the sink where it meets the countertop. Then, gently press the sink down onto the countertop.
Step 5: Install the Faucet
With the sink installed, you can now install the faucet. Insert the faucet into the holes on the sink and tighten the mounting nuts from below. Once the faucet is tight, connect the supply lines to the faucet and turn on the water supply to check for leaks.
Step 6: Install the Drawer Fronts and Doors
Now it's time to install the drawer fronts and doors. Start by attaching the drawer slides to the sides of the vanity. Then, insert the drawers into the slides and secure them with screws. For the doors, attach the hinges to the doors and the vanity. Then, hang the doors on the hinges and adjust them so they close properly.
Step 7: Finishing Touches
With the vanity completed, add the final touches. Install the cabinet hardware, such as knobs or pulls, and caulk any gaps around the vanity.
Replacing a bathroom vanity cabinet is not as difficult as it may seem. By following these steps, you can give your bathroom a fresh, updated look.

How To Install A Bathroom Vanity

How To Install A Bathroom Vanity

How To Remove A Bathroom Vanity Budget Dumpster


How To Remove Bathroom Vanity Cabinet Step By Guide

How To Replace A Bathroom Vanity The Handyman

How To Replace A Bathroom Vanity This Old House

5 Easy Steps On How To Remove A Bathroom Vanity Diy Guide

How To Install Or Remove A Bathroom Vanity Homeserve Usa

Related Posts