Essential Aspects of Cutting Holes in Bathroom Vanity
Understanding the essential aspects of cutting holes in bathroom vanities is crucial for achieving a precise and professional-looking installation of sinks, faucets, and accessories. Neglecting these aspects can lead to misalignment, damage to the vanity, and subpar results. This article will delve into the key factors to consider when cutting holes in bathroom vanities, providing guidance for effective and satisfying installations.
1. Template Accuracy
Templating is fundamental for accurate hole placement. Use the provided template or create your own precise template to mark the exact location where holes should be cut. Ensure that the template is aligned properly with the vanity's surface to prevent misalignment.
2. Hole Saw Selection and Preparation
Selecting the correct hole saw size for the desired hole diameter is essential. Ensure that the hole saw teeth are sharp to minimize chipping and tearing of the material. Use a drill press if possible, as it provides more stability and control compared to handheld drilling.
3. Cutting Depth and Speed
Drill at a slow and steady speed, applying light pressure to avoid overheating the hole saw and burning the vanity surface. Determine the appropriate cutting depth based on the thickness of the vanity and the required hole depth. Use a depth stop on the drill to ensure consistent depth.
4. Material Considerations
Different vanity materials require specific drilling techniques. For example, quartz vanities may require a diamond-tipped hole saw, while marble vanities necessitate a wet saw for clean and precise cuts. Consult manufacturer guidelines or seek professional advice for optimal results.
5. Safety Precautions
Wear appropriate safety gear, including safety glasses, gloves, and a dust mask, to minimize the risk of injury. Ensure adequate ventilation in the work area to prevent dust inhalation. Clamp the vanity firmly to prevent movement during drilling.
Conclusion
Mastering the essential aspects of cutting holes in bathroom vanities empowers DIY enthusiasts and professionals alike to achieve precise and professional-looking installations. By adhering to the guidelines outlined in this article, you can ensure accurate template marking, proper hole saw selection, controlled cutting, and meticulous attention to material considerations. These aspects are the cornerstone for a successful and satisfying bathroom vanity installation.

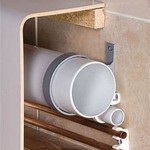
How To Cut And Modify Vanity Drawers For Plumbing Easy Diy Steps Abbotts At Home

How To Cut And Modify Vanity Drawers For Plumbing Easy Diy Steps Abbotts At Home

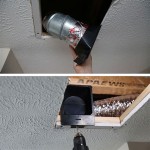
How To Measure And Cut Drain Hole In Cabinet

How To Build A Diy Bathroom Vanity Angela Marie Made

How To Build A Bathroom Vanity Sliding Shelf Interior Frugalista

Full Bathroom Remodel Part 7 Tile Counter With Sink

How To Build A Diy Bathroom Vanity Angela Marie Made

How To Install A Bathroom Sink Taskrabbit Blog

Modern Bathroom Vanity With Drawers On The Bottom Kreg Tool

How To Install A Bathroom Vanity
Related Posts