How to Remove an Old 3-Piece Bathroom Faucet
Replacing an old bathroom faucet can breathe new life into your bathroom, adding a touch of style and functionality. While it may seem like a daunting task, removing a 3-piece faucet is relatively straightforward with the right tools and a bit of patience.
Gather Your Tools and Materials
Before you start, make sure you have all the necessary tools and materials on hand. You will need:
- Adjustable wrench
- Basin wrench
- Phillips screwdriver
- Flathead screwdriver
- Bucket or container
- Plumber's tape
- New 3-piece faucet
Step 1: Turn Off the Water Supply
Safety first! Before you do anything else, turn off the water supply to the faucet. This is usually done by closing the shutoff valves located under the sink. If you have trouble finding the shutoff valves, consult your home's plumbing diagram or contact a licensed plumber.
Step 2: Remove the Pop-Up Drain Assembly
The pop-up drain assembly is the part that allows you to plug and unplug the sink. To remove it, use a screwdriver to unscrew the screw that holds it in place. Once the screw is removed, you can pull the drain assembly out.
Step 3: Disconnect the Water Supply Lines
Using a basin wrench, carefully loosen the nuts that connect the water supply lines to the faucet. Be sure to hold the water supply lines steady with your adjustable wrench to avoid damaging them.
Step 4: Remove the Faucet Handles
Locate the set screw on the back of each faucet handle. Use a Phillips screwdriver to loosen the set screws. Once the set screws are removed, you can pull the handles off the faucet.
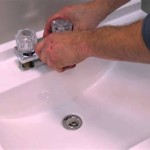
Step 5: Disconnect the Escutcheon Plate
The escutcheon plate is the decorative cover plate that surrounds the base of the faucet. Use a flathead screwdriver to pry the escutcheon plate loose. Once the escutcheon plate is removed, you can lift the faucet up and out of the sink.
Step 6: Install the New Faucet
Now it's time to install your new faucet. Align the new faucet with the holes in the sink and insert it. Secure the faucet with the nuts that came with the faucet. Hand-tighten the nuts as much as possible, then use your adjustable wrench to tighten them further.
Step 7: Reconnect the Water Supply Lines
Reconnect the water supply lines to the new faucet. Be sure to use plumber's tape on the threads to ensure a watertight seal. Tighten the nuts with your basin wrench.
Step 8: Reinstall the Faucet Handles
Slide the faucet handles onto the faucet and secure them with the set screws. Tighten the set screws with your Phillips screwdriver.
Step 9: Test the Faucet
Turn on the water supply and check for leaks. If you notice any leaks, tighten the nuts or set screws as needed.
Congratulations!
You have successfully removed your old 3-piece bathroom faucet and installed a new one. Enjoy your updated bathroom!

How To Replace A Bathroom Faucet Home Repair Tutor

How To Remove And Install A Bathroom Faucet

How To Replace A Bathroom Faucet Tinged Blue

The Pro Way To Replace A Bathroom Faucet Diy 760 594 1226

How To Remove And Install A Bathroom Faucet

How To Remove Bathroom Faucet Easy Simple

How To Replace A Bathroom Faucet Home Repair Tutor

How To Remove A Bathroom Faucet

How To Replace A Bathroom Faucet Removal And Installation

Replacing A Bathroom Faucet Fine Homebuilding
Related Posts