How to Repair a Bathroom Sink Faucet
A leaky bathroom sink faucet can be a nuisance and waste a lot of water. Fortunately, it's often a simple repair that you can do yourself with a few tools and materials. Here's a step-by-step guide on how to repair a bathroom sink faucet:
Tools and Materials
- Adjustable wrench
- Phillips head screwdriver
- Flathead screwdriver
- Replacement faucet parts (if necessary)
- Rags or towels
- Plumber's putty
- Bucket
Step-by-Step Instructions
1. Turn Off the Water Supply
Before you start working on the faucet, it's important to turn off the water supply. There are usually two shut-off valves under the sink, one for hot water and one for cold water. Turn both valves clockwise to turn off the water.
2. Remove the Aerator (if present)
Some faucets have an aerator, which is a small attachment at the end of the spout. If your faucet has an aerator, remove it by unscrewing it counterclockwise. You may need to use a wrench to loosen it.
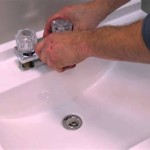
3. Remove the Handle
Next, remove the handle by unscrewing the set screw located on the side or back of the handle. You may need to use a screwdriver or Allen wrench to remove the set screw.
4. Remove the Cartridge
Once the handle is removed, you should see the cartridge. The cartridge is the part that controls the flow of water. Remove the cartridge by pulling it straight up. If the cartridge is stuck, you may need to use a wrench to loosen it.
5. Inspect the Cartridge
Inspect the cartridge for any damage or wear. If the cartridge is damaged, you will need to replace it. You can purchase a replacement cartridge at your local hardware store or home improvement center.
6. Install the New Cartridge (if necessary)
If you are replacing the cartridge, insert the new cartridge into the faucet body. Make sure that the cartridge is properly seated and aligned.
7. Reinstall the Handle
Reinstall the handle by screwing it back onto the faucet body. Tighten the set screw to secure the handle.
8. Reinstall the Aerator (if present)
If your faucet has an aerator, screw it back onto the spout.
9. Turn On the Water Supply
Turn on the water supply valves under the sink to restore water flow to the faucet. Check for any leaks and tighten any loose connections as needed.
10. Test the Faucet
Turn on the faucet and check for proper operation. The water should flow smoothly and without leaks.
Tips
- If you are not comfortable replacing the cartridge yourself, you can call a plumber for assistance.
- Before you start working on the faucet, spread rags or towels around the sink to catch any water or debris.
- When tightening the connections, do not overtighten them, as this could damage the faucet.
- If the faucet is still leaking after you have made the repairs, there may be a more serious problem that requires professional attention.
Conclusion
Repairing a bathroom sink faucet is a relatively simple task that can be completed in a few hours with the right tools and materials. By following the steps outlined in this guide, you can save yourself the cost of hiring a plumber and keep your bathroom sink running smoothly.

Diy How To Replace A Bathroom Sink Faucet Remove Install

How To Replace A Bathroom Faucet Home Repair Tutor

How To Change The Handle Rotation On A Faucet

How To Replace Your Bathroom Faucet Plumbcraft Series With Penny

How Do I Replace Bathroom Sink Faucet Handles Cleaning More

Properly Fixing A Leaky Sink Faucet Wallside Windows

How To Fix Or Maintain Your Sink S Pop Up Mechanism

Diy How To Replace A Faucet Lyons Timber Mart

Easy How To Fix A Leaky Sink Leaking From Handle Or Faucet

How To Fix A Dripping Bathroom Sink Faucet Double Handle