How to Replace a Bathroom Faucet Screen
Maintaining a clean and functioning bathroom faucet is essential for a comfortable and hygienic home. One important aspect of faucet maintenance is regularly cleaning or replacing the faucet screen. A clogged or damaged faucet screen can cause reduced water flow, sputtering, or even leaks. Replacing the faucet screen is a relatively simple and inexpensive task that can be completed by most homeowners with basic tools.
There are a few essential aspects to consider when replacing a bathroom faucet screen:
- Type of faucet: There are two main types of bathroom faucets: single-handle and two-handle. The type of faucet will determine the steps involved in removing and replacing the screen.
- Size of faucet screen: Faucet screens come in a variety of sizes. It is important to measure the old screen or refer to the manufacturer's instructions to determine the correct size for your faucet.
- Replacement screen: It is important to purchase a replacement screen that is compatible with your faucet's brand and model. Using an incompatible screen can result in leaks or other problems.
- Tools: You will need a few basic tools to replace a faucet screen, including a screwdriver, pliers, and a wrench.
Once you have gathered your tools and materials, you can follow these steps to replace the bathroom faucet screen:
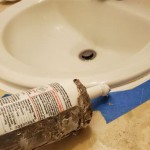
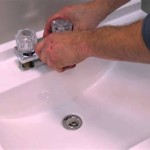
1. Turn off the water supply: Use the shut-off valves under the sink to turn off the hot and cold water supply lines. 2. Remove the aerator: The aerator is the small attachment at the end of the faucet spout. Use a wrench to loosen the aerator and remove it. 3. Remove the old screen: Once the aerator is removed, you will see the faucet screen. Use a pair of pliers to gently remove the old screen. 4. Clean the faucet: Before installing the new screen, take the opportunity to clean the faucet body and the area where the screen sits. Use a mild cleaning solution and a soft cloth to remove any debris or mineral buildup. 5. Install the new screen: Place the new screen over the faucet body and gently press it into place. Use a pair of pliers to tighten the screen if necessary. 6. Reinstall the aerator: Screw the aerator back onto the faucet spout. 7. Turn on the water supply: Turn on the shut-off valves under the sink to restore the water supply. Check for leaks at the faucet and the aerator.Replacing a bathroom faucet screen is a simple and inexpensive task that can help improve the performance and longevity of your faucet. By following these steps, you can easily replace the faucet screen and enjoy a clean and functioning bathroom faucet.

How To Remove The Faucet Aerator Ozone Microbubble Clean Systems For Bathroom Kitchen Manufacturer Strongco

Fixing A Faucet Aerator You Can Be Diy R Too The Kim Six Fix

How To Replace A Faucet Aerator Repair And

Fixing A Faucet Aerator You Can Be Diy R Too The Kim Six Fix

How To Replace A Bathroom Faucet Aerator

How To Install A Faucet Aerator Dte Energy

How To Clean And Replace An Aerator On A Faucet Or Filer Screen Shower Head Plumbing Electric Wonderhowto

Replacing A Faucet Aerator

How To Fix Your Flow Delta Faucet Blog

How To Clean Faucet Aerator Simpson Plumbing Llc
Related Posts