How To Replace A Shut Off Valve Under The Bathroom Sink
Replacing a shut-off valve under the bathroom sink is a common plumbing repair that can be completed in a few simple steps. By following these instructions, you can save yourself the time and expense of hiring a plumber.
Step 1: Gather Your Materials
Before you begin, you will need to gather the following materials:
- New shut-off valve
- Adjustable wrench
- Basin wrench
- Plumber's putty
- Teflon tape
- Bucket
- Rags
Step 2: Turn Off the Water Supply
Once you have gathered your materials, you will need to turn off the water supply to the sink. To do this, locate the main water shut-off valve, which is usually located in the basement or utility room. Turn the valve clockwise to close it.
Step 3: Open the Faucet
Open the faucet to release any remaining water pressure in the line. Once the water has stopped flowing, close the faucet.
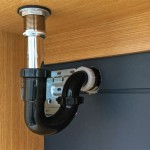
Step 4: Remove the Old Shut-Off Valve
Place a bucket under the shut-off valve to catch any water that may leak out. Using an adjustable wrench, loosen the packing nut on the shut-off valve. Once the packing nut is loose, you can use a basin wrench to remove the shut-off valve from the pipe.
Step 5: Apply Plumber's Putty
Apply a bead of plumber's putty around the threads of the new shut-off valve. This will help to seal the valve and prevent leaks.
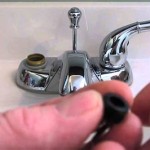
Step 6: Install the New Shut-Off Valve
Screw the new shut-off valve onto the pipe by hand. Once the valve is hand-tight, use an adjustable wrench to tighten it further. Be careful not to overtighten the valve, as this can damage the valve or the pipe.
Step 7: Wrap the Threads with Teflon Tape
Wrap the threads of the shut-off valve with Teflon tape. This will help to create a watertight seal.
Step 8: Connect the Water Supply Line
Connect the water supply line to the shut-off valve. Tighten the connection using an adjustable wrench.
Step 9: Turn on the Water Supply
Turn on the main water shut-off valve to restore water pressure to the sink. Check for leaks at the shut-off valve and the water supply line. If you find any leaks, tighten the connections until the leaks stop.
Step 10: Clean Up
Clean up any water or debris that may have spilled during the repair. Dispose of the old shut-off valve and any other materials that you used.
Conclusion
Replacing a shut-off valve under the bathroom sink is a simple repair that can be completed in a few easy steps. By following these instructions, you can save yourself the time and expense of hiring a plumber.

How To Install Water Shut Off Valve For Sinks

Replace Bathroom Sink Shut Off Valve

How To Replace A Shut Off Valve Under Your Sink

How To Replace A Shutoff Valve Diy Family Handyman

How To Replace Shutoff Valve Under Bathroom Sink

Handle Broke Off On Shut Valve Under Sink Diy Plumbing Repair Bathroom

How To Install A New Bathroom Water Supply Shutoff Valve

Condo Blues How To Replace Plumbing Valves Without Soldering

How To Replace A Flowtite Push Pull Valve With Standard Shut Off For Dishwasher

How To Repair A Leaking Sink Shut Off Valve Doityourself Com
Related Posts