How to Repair a Damaged Bathroom Sink: Essential Aspects to Consider
Understanding the intricacies of repairing a damaged bathroom sink is paramount to ensure its functionality and preserve the overall aesthetics of your bathroom. This article will delve into the essential aspects of bathroom sink repair, providing a comprehensive guide that empowers you to restore your sink to its former glory. From identifying the extent of damage to selecting the appropriate materials and techniques, we will explore the key elements that determine the success of your repair project. So, without further ado, let us uncover the fundamentals of bathroom sink repair.Identifying the Damage
The initial step in any repair process is accurately diagnosing the extent of the damage. Carefully examine the sink for cracks, chips, or leaks. Determine the material from which the sink is crafted, as this will influence the repair technique. Common sink materials include porcelain, ceramic, acrylic, and stainless steel, each with specific characteristics that dictate the appropriate repair approach.Selecting the Repair Method
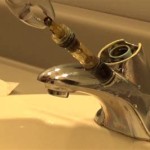
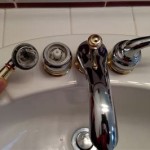
Depending on the severity of the damage, you can choose from various repair methods. Minor cracks or chips can be filled using epoxy or porcelain repair kits. For larger cracks or holes, consider using a two-part epoxy or a patch kit. Leaks can be addressed by tightening loose fittings or replacing worn-out seals. In cases of severe damage, professional plumbing assistance may be necessary.Gathering the Necessary Materials
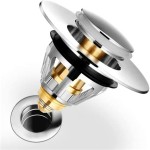
Once you have selected the repair method, gather the required materials. This may include sandpaper, epoxy, a patch kit, a wrench, replacement seals, or a plumber's putty. Ensure that you have all the necessary tools and materials before commencing the repair to avoid delays or complications.Preparing the Sink Surface
Before applying any repair material, it is essential to prepare the sink surface. Clean the area thoroughly using a mild detergent and allow it to dry completely. If necessary, lightly sand the damaged area to create a smooth surface for better adhesion.Applying the Repair Material
Depending on the chosen repair method, follow the manufacturer's instructions carefully. Apply the epoxy or patch kit according to the specified steps, ensuring a proper bond. Allow ample time for the repair material to cure completely before using the sink.Finishing Touches
Once the repair is complete, give it a final touch-up. Apply a sealant around the edges of the patch or epoxy to prevent future leaks. If necessary, adjust the fittings or replace the seals to ensure a watertight seal.Conclusion
Repairing a damaged bathroom sink requires a systematic approach that encompasses diagnosing the damage, selecting the appropriate repair method, gathering the necessary materials, preparing the sink surface, applying the repair material, and finishing with touch-ups. By understanding these essential aspects, you can confidently restore your bathroom sink to its optimal condition, ensuring its functionality and aesthetic appeal for years to come.
Gorgeous Shiny Things How To Repair A Porcelain Sink

Repairing A Water Damaged Bathroom Vanity

How To Repair Damaged Bathroom Vanity Diy

How Can I Fix This Broken Vanity Top Hometalk

Sink Repair Professional Bath Ed Restoration

Thrifty Mum Gets Rid Of A Giant In Her Bathroom Sink Using Easy Repair Kit And Saves Herself Hundreds The Sun

Sink Repair Antique Restoration Basin Resurfacing

How To Remove Scratches From A Porcelain Sink In 2024

Repairing A Water Damaged Bathroom Vanity

How To Fix A Ed Porcelain Sink 8 Steps Prudent Reviews
Related Posts