Sealing Bathroom Sink to Countertop: A Comprehensive Guide to Prevent Leaks and Enhance Aesthetics
Creating a watertight seal between your bathroom sink and countertop is a crucial aspect of maintaining a functional and aesthetically pleasing bathroom. A poorly sealed sink can lead to water damage, mold growth, and unsightly gaps that compromise the overall look of your bathroom. In this comprehensive guide, we will explore the essential steps and best practices for effectively sealing your bathroom sink to the countertop.
1. Preparation: Cleaning and Surface Preparation
Before applying any sealant, it is imperative to thoroughly clean the surfaces of the sink and countertop. Use a degreasing cleaner to remove any dirt, grime, or residue that may interfere with the adhesion of the sealant. Dry the surfaces completely with a clean cloth.
2. Choosing the Right Sealant: Silicone vs. Caulk
The choice between silicone and caulk for sealing a bathroom sink to the countertop depends on several factors, including the type of materials involved and the desired flexibility of the seal. Silicone is a more flexible sealant that is ideal for areas subject to movement or expansion, such as around a drop-in sink. Caulk, on the other hand, is a less flexible sealant that is commonly used for sealing gaps between the sink and countertop.
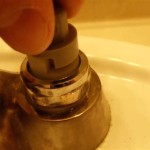
3. Applying the Sealant
When applying the sealant, start by cutting the nozzle at a 45-degree angle. This angle allows for a smooth and controlled application of the sealant. Apply a generous bead of sealant around the perimeter of the sink base, ensuring full contact with both the sink and the countertop. Use your finger or a plastic tool to smooth the sealant into a clean, even line.
4. Removal of Excess Sealant
Once the sealant has been applied, it is important to remove any excess before it dries. Use a damp rag or paper towel to gently wipe away any sealant that has squeezed out beyond the edges of the joint. This will ensure a neat and professional-looking finish.
5. Curing Time and Maintenance
Allow the sealant to cure for the recommended time specified on the manufacturer's instructions. The curing time can vary depending on the type of sealant used, so it is important to read and follow the instructions carefully. Avoid using the sink or exposing it to water during the curing period. Once fully cured, the sealant will provide a watertight barrier that enhances the functionality and aesthetics of your bathroom.
Conclusion
By following these essential steps and best practices, you can effectively seal your bathroom sink to the countertop, preventing leaks, enhancing durability, and elevating the overall aesthetics of your bathroom. Remember to choose the right sealant for your specific materials, prepare the surfaces properly, apply the sealant precisely, remove any excess, and allow ample time for curing. With a well-sealed sink, you can enjoy a beautiful and functional bathroom for years to come.

Ge Sealants How To Install A Drop Sink

How To Seal Granite Vanity Top Eagle Stones Marble

How To Build Protect A Wood Vanity Top Houseful Of Handmade

How To Easily Spray Paint Bathroom Countertops My Homier Home

Bathroom Bathtub Seal Self Adhesive Sealing Waterproof Silicone Tape For Sink Kitchen Countertop Shower Toilet And Wall Corners 1 5 X 10 5ft White Com

How Do Wooden Countertops Really Hold Up Exquisitely Unremarkable

How To Install A Bathroom Vanity

How To Refinish Bathroom Vanity Top With Diy Resin Thediyplan

How To Install Bathroom Sink On Granite Countertop

The Foolproof Guide To Diy Wood Countertops For A Bathroom
Related Posts