Bathroom Fans: Wall-Mounted Installation Guide
Bathroom fans are essential for maintaining a healthy and comfortable bathroom environment. They remove moisture, odors, and pollutants, preventing the growth of mold and mildew. Wall-mounted bathroom fans are a popular choice due to their ease of installation and space-saving design. This guide will provide a step-by-step explanation of the installation process, enabling homeowners to install their bathroom fans with confidence.
1. Planning and Preparation
Before starting the installation, it is crucial to plan and prepare adequately. This includes gathering the necessary tools and materials, determining the optimal location for the fan, and understanding the electrical requirements.
Tools and Materials:
- Screwdriver
- Drill with appropriate drill bits
- Level
- Measuring tape
- Pencil
- Wire strippers
- Electrical tape
- Safety glasses
- Work gloves
- Bathroom fan
- Mounting bracket
- Electrical wiring (if necessary)
- Outlet box (if necessary)
Location:
The bathroom fan should be positioned above the shower or bathtub, ideally as close to the center of the room as possible. Ensure the fan is at least 30 inches away from any combustible materials, such as walls or ceilings. Consider the location of electrical outlets and the need for an exhaust vent.
Electrical Requirements:
Check the bathroom fan's specifications for voltage and amperage requirements. Consult with an electrician if necessary to ensure that the existing electrical wiring can support the fan's power demands. It is essential to disconnect the power supply to the bathroom circuit before working on any electrical components.
2. Installation Process
Once the planning and preparation are complete, you can proceed with the installation of the wall-mounted bathroom fan. This typically involves the following steps:
1. Mounting the Bracket:
Begin by attaching the mounting bracket to the wall. Use a level to ensure the bracket is mounted straight. Mark the holes for the mounting screws using a pencil. Drill pilot holes if necessary, and then secure the bracket to the wall with the provided screws.
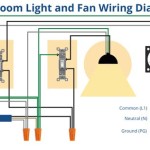
2. Connecting the Wiring:
Connect the wiring from the bathroom fan to the electrical wiring in the wall. Follow the wiring diagram provided with the fan. Use wire strippers to expose the ends of the wires and twist them together with the corresponding wires from the wall. Secure the connections with electrical tape.
3. Attaching the Fan:
Carefully attach the bathroom fan to the mounting bracket. Ensure the fan is securely fastened and aligned. Most fans will have a snap-in or screw-in mechanism for attaching to the bracket.
4. Installing the Vent:
If the bathroom fan requires a vent, install it according to the manufacturer's instructions. Typically, this involves attaching the vent to the fan and routing the vent pipe through the wall or roof to the exterior of the house.
5. Testing the Fan:
Once the installation is complete, restore power to the bathroom circuit and test the fan. Ensure the fan runs smoothly and effectively. If any problems arise, inspect the wiring connections and refer to the fan's user manual.
3. Important Considerations
While installing a wall-mounted bathroom fan is relatively straightforward, several important considerations can ensure a successful and efficient installation.
Using the Right Fan:
Select a bathroom fan with an appropriate airflow rating for the size of your bathroom. A fan with an insufficient airflow rate will not be able to remove enough moisture and odors, while an oversized fan can be noisy and consume more energy.
Maintaining Proper Ventilation:
Ensure that the vent pipe is properly routed and sealed to prevent leaks. A leaky vent can reduce the effectiveness of the fan and allow moisture to escape into the attic or other areas of the house.
Regular Maintenance:
Regularly clean the fan blades and vent to remove dust and debris that can impede airflow. Replace worn-out parts as needed to maintain optimal performance.
Professional Installation:
If you are unsure about any aspect of the installation process or have concerns about electrical wiring, consider contacting a licensed electrician for professional assistance. They can ensure that the installation is done safely and meets all applicable building codes.

How To Install A Bathroom Fan Step By Guide Bob Vila

What Extractor Fan Do I Need For My Bathroom Blog World

Exhaust Fan Through Wall Mount

Bathroom Exhaust Fans Types Uses Benefits And More

What Parts Do I Need To Install A Wall Mounted Fan S Extractor World

How To Install An Exhaust Fan In A Wall

4 Inch Exhaust Fan Wall Mounted Vent Fans Ventilation Extractor 110v Square Blower For Kitchen Bathroom Laundry Room Com

Ext External Mount Bathroom Fans Continental Fan

6 8 10 12 Inch Commercial Kitchen Garage Wall Exhaust Ventilation Fans Futina

Invisible Fans Yanko Design Bathroom Fan Exhaust
Related Posts