Bathroom Sink Rough-In: A Comprehensive Guide
When embarking on a bathroom renovation, understanding the rough-in stage is crucial. The bathroom sink rough-in refers to the preparatory plumbing and support framework for installing a new sink. Proper planning and execution of this stage ensure a seamless and functional bathroom design.
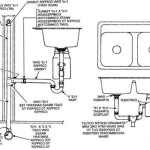
Drainpipe Placement
The drainpipe, responsible for draining water from the sink, must be accurately positioned. Standard sink drains measure approximately 1.5 inches in diameter and should be installed with a slight slope to facilitate water flow. The drainpipe should extend from the sink's drain hole to the designated drain connection point.
Water Supply Lines
Two water supply lines, one for hot and one for cold water, must be connected to the sink. These lines should be made of durable materials, such as copper or PEX, and should be sized appropriately for the sink's flow rate requirements. The hot water line is typically placed on the left side of the sink, while the cold water line is on the right.
Faucet Hole Spacing
The faucet hole spacing is the distance between the centers of the two holes where the faucet will be mounted. Standard faucet hole spacing ranges from 4 to 8 inches, with 6 inches being the most common. The faucet you choose must be compatible with the hole spacing of your sink.
Mounting Bracket
A mounting bracket, typically made of metal, provides support for the sink and prevents it from moving. The bracket is secured to studs in the wall and provides a solid foundation for the sink's installation. Different types of mounting brackets are available, depending on the sink's design and weight.
Testing and Inspection
Once the rough-in is complete, it's essential to conduct thorough testing and inspection. Run water through the sink and faucets to check for any leaks or inconsistencies. Ensure that the drainpipe is properly secured and that all connections are watertight. Professional plumbers often recommend pressure testing the water lines to verify proper functionality.
Conclusion
Mastering the intricacies of bathroom sink rough-in is vital for a successful bathroom renovation. Accurate drainpipe placement, water supply line installation, faucet hole spacing, mounting bracket placement, and thorough testing ensure a functional and long-lasting sink system. By following these guidelines and maintaining attention to detail, homeowners and contractors can create a bathroom that seamlessly combines aesthetics and functionality.

How To Plumb A Bathroom With Multiple Plumbing Diagrams Hammerpedia

A Vessel Sink Conversion Fine Homebuilding

Loading Bathroom Plumbing Rough In Diy

Bathroom Plumbing Rough In Dimensions Astonishing Toilet Sink Drain

Quick Guide To Bathroom Sink Plumbing Rough In Heights Phyxter Home Services

Pin On Bathroom Remodeling

Rough In Plumbing Bathroom Dimensions Jim The Home Guy

Basement Remodel Day 2 Plumbing Rough In Detail

What Is The Bathroom Sink Drain Rough In Height Guide

Double Bathroom Sink Two Diffe Rough Plumbing Drain Methods